My Build Progress (1 Viewer)

Buddha

High Hand
Joined
Feb 19, 2015
Messages
78
Reaction score
44
Location
OH
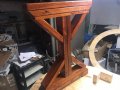
While technically this is my 2nd table, the first table I built was over 10 years ago, and was left at a volunteer fire hall (we used it for cash games there). I have decided that I want to be able to host a half way decent game, and have started building a table. I had a thread showing the DIY wood legs I made. I want try to document some of the process here, so I started this thread, but it may be tomorrow, or next week that I get done (doing it in spurts as I get the motivation).

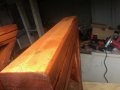
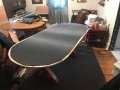
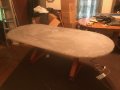
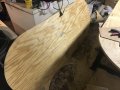
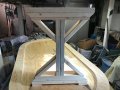
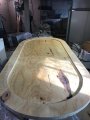
I had actually gotten the wood over a week ago, but didn't think ahead, and just got the full sheets of plywood, but I knew that I wanted to rip it down a bit. I was going to make the table 44x92. After some Youtube videos, and general DIY information gain, I tried to set up a fence. Well, I started with a cheap Walmart circular saw, and it tried to run up the fence and caused ugly ugly cuts. Today I went to Sears, and bought a cheap Craftsman circular saw. While the stated spec are the same/similar, the Craftsman was able to move smoothly over the plywood, and with the fence I attached to the full sheet of plywood, I was able to rip the first piece of plywood, and I changed to 42x90 (and if my calculations are right, okay, a website's, that should leave 22" per person, to seat 10.

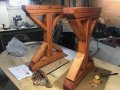
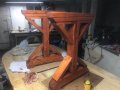
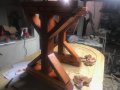
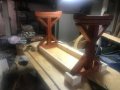
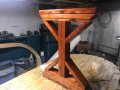
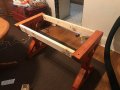
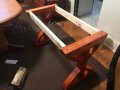
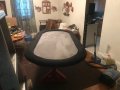
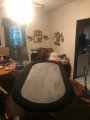
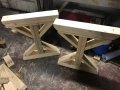
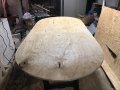
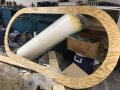
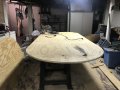
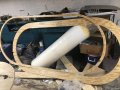
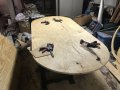
So we now have legs built, need to be sanded/stained, and one of two sheets of plywood starting to look like a table (rough cut with jig saw, will sand the edges to hopefully smooth it out a bit). Honestly, getting the plywood to size has been my biggest cause of my lack of motivation. Now that I had gotten then ripped down with the better saw, I have a bit more motivation to keep moving.

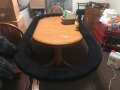
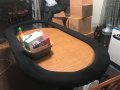
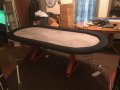
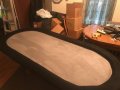
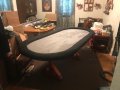
I already have 1" foam from YAT, and am going with headliner for the surface (went back and forth between headliner and 1/4 from YAT, but enough good comments on headliner, and a test at Joann's made me think it will be just fine). I believe I am going to go 5" rail, but might go 4". Haven't gotten any vinyl, as I think I might want to go suede, or some sort of softer fabric for the rail. As for the playing surface, I am doing something from Joann's, as I just want to get it locally, and figure I will be able to find something that looks decent, feels good, and allows the cards to slide.

This is also going to be the first of may DIY fixes/upgrades around the house, as lots of stuff needs done.
 

Attachments

  • IMG_1088.JPG
    IMG_1088.JPG
    149.5 KB · Views: 354
  • sheet.jpeg
    sheet.jpeg
    142.7 KB · Views: 343
Rail cut. Since I was between 4 and 5", i went 4.5". Under rail lip cut, playing surface cut. Small piece from the rail cut has already been attached to the bottom side of the playing surface piece.

All cuts should be done. Sanding next, then assembling the rail. I believe I am done for tonight though.

Looks much better than full sheets of plywood looking to get used.
 

Attachments

  • IMG_1091.JPG
    IMG_1091.JPG
    140 KB · Views: 340
  • IMG_1092.JPG
    IMG_1092.JPG
    136.2 KB · Views: 349
  • IMG_1093.JPG
    IMG_1093.JPG
    142.7 KB · Views: 355
  • IMG_1094.JPG
    IMG_1094.JPG
    142.6 KB · Views: 344
  • IMG_1095.JPG
    IMG_1095.JPG
    122 KB · Views: 333
  • IMG_1096.JPG
    IMG_1096.JPG
    135.1 KB · Views: 316
Assembled the rail and sanded the sides. Test fit it against the table, and sanded the filling on the legs. Staining the legs will likely be the next step since I haven't bought rail fabric yet.
 

Attachments

  • testfit with leg.jpeg
    testfit with leg.jpeg
    147.4 KB · Views: 260
  • testfit.jpeg
    testfit.jpeg
    136.6 KB · Views: 252
Coming along nicely, the plywood parts look great! Always enjoy seeing table builds.

I changed to 42x90 (and if my calculations are right, okay, a website's, that should leave 22" per person, to seat 10.
Even better actually - just over 22-3/4" each. :)

Haven't gotten any vinyl, as I think I might want to go suede, or some sort of softer fabric for the rail.
+1 on the suede, got mine from YAT. Very nice to work with, and super comfortable.
 
HD foam might be a better choice for the playing field. i had headliner foam on a table i built many years ago and it worked but you can definitely feel the wood underneath. also YAT has 2 kinds of suede you can use for a rail. if you go that route make sure you get the foam backed rail. its a little more expensive but way easier to work with
 
First time I have ever stained anything. Unsure of a 2nd coat or not. Part of me wants it a little darker, part of me likes it like it is.
 

Attachments

  • stained legs.jpeg
    stained legs.jpeg
    148.7 KB · Views: 255
I am thinking about the spacers to attach to the top, and that got me thinking about the leg placement, and I want to see if I am thinking about right. Table is 90" long. Should I be putting the legs at 22.5" in from each end? My thought was middle of the table is at 45", putting each leg in the middle of that half of the table, or 22.5" in from each end.

I hadn't thought much about how to attach the table, but I think the weight and the support it will have on the legs won't require it to be permanently attached. I thought about using scraps to build a little housing spot on the base of the table, so that I can just rest the top on top of the leg structure, in the perfect place every time.
 
Put on a 2nd coat of stain after work. Darkened them up a little more. I didn't do the tops again (don't really know why I did it the first time), but in the last picture, you can see the difference of one coat and the 2nd coat, though it was right after it was wiped down, so it could possibly lighten up a little more as it dries. Hopefully tomorrow (this evening I supposed, but since I work overnight, to me it is tomorrow) I can put the first coat of poly on, and hopefully just one or two coats there.
 

Attachments

  • IMG_1114.JPG
    IMG_1114.JPG
    123.2 KB · Views: 276
  • IMG_1115.JPG
    IMG_1115.JPG
    110.3 KB · Views: 273
  • IMG_1116.JPG
    IMG_1116.JPG
    82.1 KB · Views: 280
Nice job so far. I'm hoping this spring/summer will be the year I go for it and try my hand at a table build.
 
Nice job so far. I'm hoping this spring/summer will be the year I go for it and try my hand at a table build.

Thanks. I am enjoying the process. I have had basic usage of tools/woodworking before, but find myself enjoying it more now, and looking at possibly things to build. Pinterest can be addicting when looking at possibly DIY projects involving wood.

With the building of this, and future projects/home improvement projects I will need to do, I have gone from owning a jigsaw and drill, to a couple drills, miter saw, circular saw, belt sander, orbital sander, and various smaller things. Lots of things running through my head, but I will have to take things one at a time, unless I can start to build things to sell on the side ;)
 
HD foam might be a better choice for the playing field. i had headliner foam on a table i built many years ago and it worked but you can definitely feel the wood underneath. also YAT has 2 kinds of suede you can use for a rail. if you go that route make sure you get the foam backed rail. its a little more expensive but way easier to work with

I get what you are saying with the headliner, as I just laid it over the table and placed some fabric on it to see what it was like. I don't necessarily mind that feeling though, as to me, it helps reinforce the sturdy, good build feel. I had some sort of cotton type material I had gotten cheap that I just laid on top of the headliner, and like that it is enough to easily riffle the cards, yet not so much you can't feel the table. This fabric was cheap (less than $3/yard), and I am actually considering using it. It needs ironed, wasn't flat/tight, and granted I was standing when pitching the cards, but it seems possibly usable.

This was done using some early/mid 2000s (2004-2006/7 I think) Copag WSOP cards.
 
I've played on a table that had headliner on the playing surface instead of HD closed cell foam. I didn't like it...
 
Looking good! (y) :thumbsup:
 
Cut out and made some 'braces', more like leg placement holders and screwed them into the table, and also test fit the spacer and the legs under the table. Since the spacer is being left unfinished, should I attached it before or after poly-ing the legs? I like the thought of leaving them individual to to poly, then putting the spacer on, but didnt know what others have done/proper way, as I am an amateur wood worker.
 

Attachments

  • undersidetest.jpeg
    undersidetest.jpeg
    104.3 KB · Views: 229
  • undertest2.jpeg
    undertest2.jpeg
    105.6 KB · Views: 239
I went back to Joann's today and bought some velour (black) for the rail, and some microsuede (charcoal gray) for the playing surface. One coat of ply has been applied to the legs, we are getting closer to the finish. Someone tell me that I should do at least 2 coats of poly, because my lazy mind keeps telling me that they are just legs, they don't need the protection, that one coat will be fine hah.
 
I went back to Joann's today and bought some velour (black) for the rail, and some microsuede (charcoal gray) for the playing surface. One coat of ply has been applied to the legs, we are getting closer to the finish. Someone tell me that I should do at least 2 coats of poly, because my lazy mind keeps telling me that they are just legs, they don't need the protection, that one coat will be fine hah.

People are gonna kick them. 2 or 3 coats!
 
I did put a 2nd coat of poly on. They are looking good. I had bought the small can, so at best, I might be able to get a 3rd coat, but we will see what it looks like after the 2nd coat dries. Took care of the least favorite part of table building today.
 

Attachments

  • rail1.jpeg
    rail1.jpeg
    106.2 KB · Views: 266
  • rail2.jpeg
    rail2.jpeg
    108.5 KB · Views: 310
  • leg1.jpeg
    leg1.jpeg
    131.5 KB · Views: 275
  • leg2.jpeg
    leg2.jpeg
    130.7 KB · Views: 248
Finally! That thing was a bitch to get from the basement upstairs by myself with the narrow/uneven stairs from the basement up. I of course assembled it upstairs, after doing everything else. I did not attach the rail, at least for now, as it sits pretty nice, and I realized I drilled pocket holes to secure the table to the spacer/stretcher facing down, instead of into the table, so the table just rests on the base, but with the weight, feels pretty sturdy.

Lighting is mediocre with limited moving around right now, so the pictures are meh at best, but you can get the gist.
 

Attachments

  • IMG_1135.JPG
    IMG_1135.JPG
    125.9 KB · Views: 312
  • IMG_1136.JPG
    IMG_1136.JPG
    106.9 KB · Views: 294
  • IMG_1137.JPG
    IMG_1137.JPG
    118.9 KB · Views: 293
  • IMG_1138.JPG
    IMG_1138.JPG
    111.5 KB · Views: 293
  • IMG_1139.JPG
    IMG_1139.JPG
    88.2 KB · Views: 278
  • IMG_1140.JPG
    IMG_1140.JPG
    102.5 KB · Views: 289
  • IMG_1141.JPG
    IMG_1141.JPG
    94.2 KB · Views: 307
  • IMG_1142.JPG
    IMG_1142.JPG
    107.9 KB · Views: 310
  • IMG_1143.JPG
    IMG_1143.JPG
    96.7 KB · Views: 303
  • IMG_1144.JPG
    IMG_1144.JPG
    85.2 KB · Views: 286
Found this on FB. Think I'm going to repurpose the legs for my table.

34859387_593482281026970_1068997139268370432_n.jpg
 
Last edited:
I did not attach the rail, at least for now, as it sits pretty nice,

I think in most cases if your rail is sitting nice and flat that you are better off not to attach it. Just let gravity do its thing. This makes cleaning the felt much easier. Moving is easier also if needed.
 
I went back to Joann's today and bought some velour (black) for the rail, and some microsuede (charcoal gray) for the playing surface. One coat of ply has been applied to the legs, we are getting closer to the finish. Someone tell me that I should do at least 2 coats of poly, because my lazy mind keeps telling me that they are just legs, they don't need the protection, that one coat will be fine hah.

I always use at least three. People tend to rest their feet on them so the additional poly will help protect the finish. It's so easy to put another coat or two on.
 
Got the legs attached. Worked out well that I had just recently seen another persons thread that showed attaching this kind of table bottom to make it easier for me to do without having to think much! Probably just a touch narrower that I would like, as it came from a 'hallway' table, but it supports the table well.

IMG_1483.JPG IMG_1484.JPG IMG_1485.JPG IMG_1486.JPG
 

Create an account or login to comment

You must be a member in order to leave a comment

Create account

Create an account and join our community. It's easy!

Log in

Already have an account? Log in here.

Back
Top Bottom