ESPN table journey (1 Viewer)

TomatoGrass

Sitting Out
Joined
Aug 6, 2021
Messages
40
Reaction score
42
Location
Alabama
Hello all! I have been around the forums just poking my head in here and there. I thought it might be a good place to post my journey with the ESPN LED poker table.

Two years ago, I decided to start hosting my own games. This started in my tiny one bedroom apartment with one table of guys from work. I knew nothing about any forums or anything, so I just ventured into the wilderness on my own. Without a big budget, I opted for the ESPN LED poker table, which at the time was $199 from Walmart (still a STEAL in my opinion). Below is where I started:

8AA76231-6967-4A7E-869D-3A7AFAE00272.jpeg


As you can see, I was using just simple Monte Carlo chips and Copag cards. The blue LED lights completely washed out the chip colors, but at the time I didn’t care. It looked cool to me.

So the game roster started growing and so did my passion for running a game. Early on, I made three rather important upgrades to my table. First, I purchased Enginstar battery packs to run the lights from a battery (under the table) instead of using an extension cord.

4CEBC38D-54E8-4F72-A503-06D219B9B10F.jpeg


Next, I simultaneously upgraded the cup holders to deeper ones, and I changed the blue LEDs to RGB. This allowed me to change to a white color for 95% of the time and kept chip colors from being washed out.

Upgrading the cupholders involved using a 3 inch Hole Dozer drill bit, as well as using an angle grinder to trim up the bar on the bottom of the table.

D5465537-CE91-4605-8B82-CAC12A163FD9.jpeg


34A5D3FE-CF76-46C0-827A-496EA05EC670.jpeg


5BDDEB7E-0E7B-40B0-B0E0-30A61D0FD29C.jpeg


35DA079F-3E04-4A33-A2AC-4951B055E0C6.jpeg


4AEED862-C365-480B-914D-F8AE40F155B7.jpeg


Now to be honest, I ran with this setup for over a year. I would recommend anyone who has these tables to at least do these three upgrades at a minimum. They are low cost and low effort, but change the experience immensely. I even began running two table games with two identical setups like this.

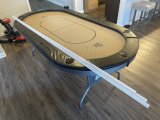
Recently, I became a little careless when moving a table, and the felt ripped. I decided it was time to refelt these tables anyways just to see what it would be like.

The only real difference between these and the Barrington tables is the small piece of wood under each rail to mount the LEDs. These pieces of wood are held in by screws/staples (?), and the wood can be removed with a flathead screwdriver. I then just hammered the metal pieces sideways until they were flush with the wood.

7B0057EF-E0A0-40AC-8547-F3FA5D0148F2.jpeg


7D202799-FE65-4C26-9CB6-35672CDC0297.jpeg


Now I’m a complete amateur, and when I put the new suited speed cloth on, I was more worried about it being TIGHT than exactly straight. The lines are a little wonky but I’m not really concerned.

To diffuse the LEDs, I came across these 4’ zip ties I had purchased a year ago. It just so happens that each half of the table has an inside perimeter of almost EXACTLY 8 feet. So I trimmed the edges off these zip ties, and used 6 per half of the table (3 ties thick, two sections to cover 8 feet). They are the PERFECT height between the table and the rail, and the white plastic gives a great diffusing effect to the LEDs.

6B866E07-B284-44F8-8394-5ECDD42535C2.jpeg

BFE50036-C358-46DF-8F68-9E57B2B05DCA.jpeg


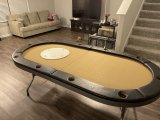
And there you have it. A really tight budget upgrade of a budget table, turned into something that the guys and I enjoy playing on!

D6941512-70F9-4826-B096-74AE0ACCFD33.jpeg

A5B86228-E7BD-4740-9D03-7DB4B96BD89E.jpeg

IMG_9928.jpeg

So I guess this wouldn’t be a PCF thread if I didn’t mention what chips we use…

All of my chips are from BRPro. I can’t say enough good things about them, and I love ceramic chips.

We run T30,000 starting stack tournaments and $1/2 cash games. For tournaments, I have semi custom sets of Tiki Kings and Dia De Los Muertos chips. The guys love these.

For cash games, we have one set of full custom ceramics and another coming soon.

D5B2FB35-9FC1-4EC5-96CE-39818BB5879A.jpeg

0C41FDB7-459A-47A7-85CB-28646D61E70F.jpeg


Also, I can’t forget to mention that Desjgn cards are by far the crowd favorite of our game.

Thank you for reading and I hope you have a great day!!
 

Attachments

  • 0DFC66B2-A9F7-4664-ACC3-235E7AF8DF51.jpeg
    0DFC66B2-A9F7-4664-ACC3-235E7AF8DF51.jpeg
    169 KB · Views: 901
  • FE125DF5-29A6-4281-A114-0A317D01EF4C.jpeg
    FE125DF5-29A6-4281-A114-0A317D01EF4C.jpeg
    180.3 KB · Views: 917
Last edited:
Timing is everything.

First, nicely done!

My ESPN table arrived Saturday. I want to do better cup holders, and was thinking Jumbo, but after looking at yours taken apart, I don't think you have the room for wider holes. What are you thoughts? Could you fit another .5" of hole?

Thanks,

Mud
 
672B1135-138D-4C8C-9F7B-0A052E7CFE4F.jpeg

This is the one that matters most. All the other cosmetic changes are great, but this is the difference between a place to put your drink and a way to prevent spills.
Nice work.
 
I love it! I love when people come up with these kinds of hacks, well done!
 
Timing is everything.

First, nicely done!

My ESPN table arrived Saturday. I want to do better cup holders, and was thinking Jumbo, but after looking at yours taken apart, I don't think you have the room for wider holes. What are you thoughts? Could you fit another .5" of hole?

Thanks,

Mud
Thanks!

First of all, good luck and have fun upgrading the table. It’s a blast getting an idea of what you want and having it all come together.

To answer your question, yes I think you could go for jumbo cup holders in this table. There should be enough room to hold the extra hole space and I was considering it for some time. There’s a reason I went with the standard though:

All you need to do to fit the standard size cupholders is drill holes in the wood in the appropriate spots. You actually don’t even have to take off the rails to do this (I didn’t on my second table), and I’d recommend you don’t take them off when drilling cupholder holes. This is because you are guaranteed for the rail hole and the drilled hole to line up perfectly.

When I took the rails off, my drilled holes were slightly off the rail holes, and it was quite a problem.

With jumbo cupholders, not only do you have to drill the holes in the wood, you also have to open up the holes in the rail. Now you’re getting into cutting vinyl and whatnot, and I could foresee myself getting into a lot of trouble going that route. But that’s not to say it would be really that difficult to do!

Let me know what you decide and how it turns out!
 
I love it! I love when people come up with these kinds of hacks, well done!
As long as I don’t end up on the fugly poker table thread someday! That was the one thing that kept ringing in my head, “you’re teetering the line with some of this stuff” hahaha.
 
To use the corner guard, you just need to snip the plastic on the side that attaches to the table every inch or so. I wound up using it on two of my tables, and plastic tubing for another table that I did not want to raise the rail as much for.
 
To use the corner guard, you just need to snip the plastic on the side that attaches to the table every inch or so. I wound up using it on two of my tables, and plastic tubing for another table that I did not want to raise the rail as much for.
Yes, you are correct. Before I gave up on those I was trimming them into smaller pieces as well as trying to trim some in half so there was no bend. But I found that they were really brittle and they were cracking no matter how I tried to cut them. I even tried scoring them with a utility knife before cutting them or breaking them, but they still cracked in all odd shapes. I got lucky with the zip tie solution because it works perfectly. And they are white.

Edit: didn’t even process what you had said until just now. Yeah snipping it on the one side every inch would definitely give it flexibility. I didn’t even think of that! Clever and would definitely work.
 
Last edited:
Nice mods to make a decent table into a pretty good table. Appreciate the details and admire the work.
 
Update and advice: DON’T draw a dark betting line onto felt. I thought it would be a good idea but you’ll never have a line that won’t give up some dark ink. As in onto your playing cards, onto your chips (would be disastrous), onto your hands. Even if you don’t think you’ll press down that hard onto the line, it’s just not worth it.

Quick refelt with new cloth. I may sublimate some large club logos onto it (which don’t leak ink), but might just leave as is. All the other mods are still good. And I think this felt may have ended up straighter? Who knows.

Tldr: Poker table betting line fail

D8A5F08E-F8A4-4E9C-ABAF-EBED8469E8CF.jpeg


DEF70813-85B3-4FF8-AA0E-48D3CBC58DD6.jpeg
 
Last edited:
Great mods and post.

Don’t the deeper cup holders prevent you from folding the table?

Your replacement cup holders are 3” wide x __” tall?

Any additional detail or pics you can provide about having to grind a support bar underneath?
 
https://www.thepokerstore.com/colle...d-stainless-steel-drop-in-cup-holders-10-pack

The cupholders are 2 5/16” deep.

They just barely go through the wood and don’t really stick out through the other side. Therefore it doesn’t affect folding the table at all.

4 of the cupholders are directly over the top of the support bars. In theory you COULD get away with not grinding the bars since the cupholders really won’t go down that far. But trimming the bar makes it easier to drill through the table and not run into a metal bar.

I just used an angle grinder (Makita) to trim the ends of the bars about a couple of inches. Just far enough that it is no longer in the way of where you would drill. Tough to display in a picture but when you go to start drilling holes into the table you would see where they might be in the way.
 
A30C3C8B-E8DD-4E89-8698-9BF9E5D89735.jpeg


New larger sublimation logos on the second table. 8x8”. Just done with an iron like everyone says you can’t do. One side is good the other meh but it’ll do! And there is absolutely zero ink bleed onto cards or chips, you can’t even feel the logo.

The next step is to reupholster the rails. I’ll probably get a couple yards of dark brown vinyl from yourautotrim.com.
 
Last edited:
Nice work. Cup holders seems a great upgrade. I'm seeing this table available again for about $260. What about the original felt made you want to upgrade? I'm tempted to get this table because of the middle fold for storage and the led lights in my fairly dark poker area. But I don't want to feel an immediate need to upgrade felt if its bad factory for some reason.
 
It lasted for 2 years, and I got careless putting it away and it ripped. So I changed both! Speed cloth is much better imo, but that’s just preference.

The original is fine, but you will probably have to tighten it. You can do this by cutting the felt within the table fold, pull it tight, and staple it again. I don’t have any pictures, but can give you more details if you need them. It seems to be a common theme that the felt gets really loose (to the point where air can get under it and balloon up a couple inches lol). You don’t have to take off the rails though.
 
Original felt is slow and grabby when dealing, but no one even said anything about it until I had one table with SSC and one with the factory felt still.
 
It lasted for 2 years, and I got careless putting it away and it ripped. So I changed both! Speed cloth is much better imo, but that’s just preference.

The original is fine, but you will probably have to tighten it. You can do this by cutting the felt within the table fold, pull it tight, and staple it again. I don’t have any pictures, but can give you more details if you need them. It seems to be a common theme that the felt gets really loose (to the point where air can get under it and balloon up a couple inches lol). You don’t have to take off the rails though.
How do you like the lights in use? Seems these ESPN tables are more easily available than the barrington without the lights.
 
How do you like the lights in use? Seems these ESPN tables are more easily available than the barrington without the lights.
I replaced the lights with RGB to make them not blue and dimmer, after diffusing them they are great.

It's time for a custom felt with @T_Chan or topper from @rjdev7 !!

A custom felt is as much as my entire setup minus the battery. If you’re going to go with custom gaming suede, you ought to get a decent table to go with it not a cheap barrington or espn lol. And I’m not a fan of toppers.

Their work is amazing, just not for me or my budget.
 
Last edited:
IMG_9928.jpeg


So I’ve added a third table. Couldn’t get an ESPN table this time, so I went with the Raychee LED table with USB ports. The construction is identical.

After about 8 hours doing the above steps, I have another functional table.

In regards to the USB ports for this, I’d recommend getting rid of existing Chinese hardware and buying some decent usb and usb c extension cables and a usb charging hub.

The existing routed housing and mounting face for the cheap usb hardware is actually really decent on this table, and after spending around 100 on Amazon and using some mounting tape, the USB charging functionality is actually pretty nice. I’m using the second Enginstar Power Station for the USB functionality, and the other two tables’ lights can just use halo bolt batteries.
 
Like sublimated on a different material then ironed on? Sorry not at all familiar with dye sublimation.
That’s okay!

So there are different ways to get logos onto material: sublimation, vinyl, etc…

Doing a sublimation transfer is a couple steps. First, the design needs to be printed onto transfer paper. For me, I don’t have the right kind of printer or paper, so I just sent my logo to a vendor on Etsy and they do it.

So at this point, you have a special sheet of paper with your logo printed on it with a special ink. This logo will appear backwards on the paper because you need to set the paper face down and transfer it to the desired material with heat.

You are supposed to do this with a heat press. This will apply the heat evenly and uniformly, creating a sharp, vibrant, and crisp image.

I went the cheap route and just used a household iron. To do this, I used heat transfer tape to hold down the printed logo, then covered THAT with just printer paper (you don’t want to put the heat source directly onto the transfer paper). Then I just put the iron down for two minutes at a time in different spots around the paper until it was done.

If you have an iron you can do the whole thing for like ten bucks.
 
Last edited:
That’s okay!

So there are different ways to get logos onto material: sublimation, vinyl, etc…

Doing a sublimation transfer is a couple steps. First, the design needs to be printed onto transfer paper. For me, I don’t have the right kind of printer or paper, so I just sent my logo to a vendor on Etsy and they do it.

So at this point, you have a special sheet of paper with your logo printed on it with a special ink. This logo will appear backwards on the paper because you need to set the paper face down and transfer it to the desired material with heat.

You are supposed to do this with a heat press. This will apply the heat evenly and uniformly, creating a sharp, vibrant, and crisp image.

I went the cheap route and just used a household iron. To do this, I used heat transfer tape to hold down the printed logo, then covered THAT with just printer paper (you don’t want to put the heat source directly onto the transfer paper). Then I just put the iron down for two minutes at a time in different spots around the paper until it was done.

If you have an iron you can do the whole thing for like ten bucks.
Got it thanks! Can you pm me the Etsy link?
 
I replaced the lights with RGB to make them not blue and dimmer, after diffusing them they are great.


A custom felt is as much as my entire setup minus the battery. If you’re going to go with custom gaming suede, you ought to get a decent table to go with it not a cheap barrington or espn lol. And I’m not a fan of toppers.

Their work is amazing, just not for me or my budget.
Where did you get the RGB lights from for your table?

My barrington table are bright. Might try those zip ties..how did they hold out?
 

Create an account or login to comment

You must be a member in order to leave a comment

Create account

Create an account and join our community. It's easy!

Log in

Already have an account? Log in here.

Back
Top Bottom