58" round build. Slow burn (1 Viewer)

Joined
Nov 9, 2020
Messages
120
Reaction score
260
Location
Victoria, BC
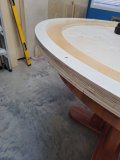
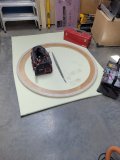
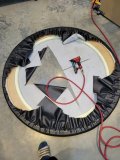
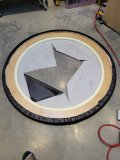
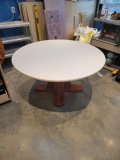
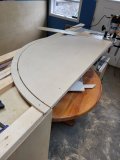
Building a 58" round topper. 3/4" ply so I'll either sit it on top of my 48" table or swap the tops as required. Got a free "bottom sheet" of 3/4" x 4x8 when I bought a bunch of prefinished birch so I decided to build the rounds rather than buy 2 sheets of 5x5. Less than ideal but it only cost me 2/3 of a sheet I already had. Will biscuit or pocket hole the long edge to add strength. Stagger the joints on the rail and it should be strong enough.

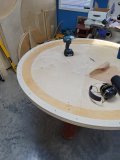
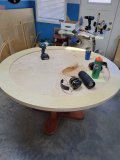
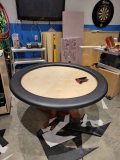
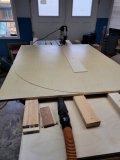
Quick and dirty router jig did a good job. Making everything in half circles doubled my set up time which sucked but got it done.

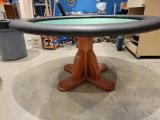
Later this week I'll knock the corners off with the router.

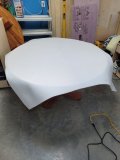
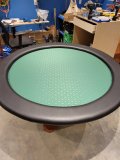
Going to be a slower process as I haven't sourced foam or vinyl yet. Will try locally first but it may get added to the speed cloth order.

For now my big concern was getting the round cut out and glued up so I have a big enough surface to host 8 rather than moving the dining table to the shop.
 

Attachments

  • 20210716_121302.jpg
    20210716_121302.jpg
    89.9 KB · Views: 170
  • 20210716_123629.jpg
    20210716_123629.jpg
    105.9 KB · Views: 161
  • 20210716_143730.jpg
    20210716_143730.jpg
    107.4 KB · Views: 160
  • 20210716_152319.jpg
    20210716_152319.jpg
    125.3 KB · Views: 164
Last edited:
I made a 58" round for myself and did the same thing piecing together the rail. As you said, it's more work, but it turned out fine. I much prefer playing on it vs. my oval tables.
 
Got the table and the rail parts glued and assembled. No concerns about structure, staggered joints, biscuits and pocket screws and everything feels solid.
Ordered speed cloth and slide under cup holders. Sourced vinyl and foam locally, will pick it up Monday. Hoping cloth arrives by Friday, hosting again in a week.
 

Attachments

  • 20210721_145609.jpg
    20210721_145609.jpg
    83.3 KB · Views: 165
  • 20210721_145603.jpg
    20210721_145603.jpg
    112.6 KB · Views: 166
  • 20210721_145531.jpg
    20210721_145531.jpg
    116 KB · Views: 164
Got the rail done today. Used the stretch trick on both the foam and vinyl. Can confirm stretching and fastening the vinyl is a pain. Speed cloth should arrive in next day or so. Hosting on Monday night.
 

Attachments

  • 20210727_143236.jpg
    20210727_143236.jpg
    109.8 KB · Views: 230
  • 20210727_181758.jpg
    20210727_181758.jpg
    115.4 KB · Views: 194
  • 20210727_191542.jpg
    20210727_191542.jpg
    153.3 KB · Views: 197
  • 20210727_195434.jpg
    20210727_195434.jpg
    126.8 KB · Views: 201
  • 20210727_202424.jpg
    20210727_202424.jpg
    148.5 KB · Views: 230
  • 20210727_211048.jpg
    20210727_211048.jpg
    126.3 KB · Views: 244
Very nice! I agree that a round table is much easier to play on vs a long oval. Especially if you're taking turns dealing. Interested in what you're total material cost ended up being.
 
5" plywood rail, foam on both sides. Definitely looks wider than i thought it would.
1" HD extra firm foam 60x80, $88
1/4" foam 54x54, $36
heidi black vinyl 60x72. $80
Green speed cloth 60x60, $40
10x slide under cup holders, $55
staples, $7
random hardware for swapping tops (tnut inserts, bolts) $5
air stapler $47
plywood was free because I had some decent stuff laying around.
pedestal base is from a used 48" table i picked up online, $40

putting some tnut inserts in both tops so i can swap out as needed. Will put french cleats under tops and on shop wall so i can hang both when not in use and free up some floor space.
 
Finished it up last night. Speed cloth came folded so it got ironed first. Still had lines but so far I think they all disappeared when I glued to the foam.

Ran foam all the way to the edge to make for a level surface for slide under cup holders. Decided against stapling the cloth as well. Thought it might bunch up and create waves in the playing surface.
I cut some dime sized holes in the cloth/ foam near the perimeter to so I could screw the rail and playing surface together without the screws grabbing some cloth.

All in all pretty happy with the result. Vinyl wrap at the inside of the rail is a little clunkier than I had hoped but lesson learned and I suspect I'll be the only on that notices.

Thanks to the forum for the build threads and a few people I poked along the way for advice.
 

Attachments

  • 20210730_151540.jpg
    20210730_151540.jpg
    92.2 KB · Views: 292
  • 20210730_201643.jpg
    20210730_201643.jpg
    83.5 KB · Views: 213
  • 20210730_204511.jpg
    20210730_204511.jpg
    153.2 KB · Views: 247
  • 20210730_211937.jpg
    20210730_211937.jpg
    133.8 KB · Views: 249
  • 20210730_211944.jpg
    20210730_211944.jpg
    125.8 KB · Views: 295
  • 20210730_212231.jpg
    20210730_212231.jpg
    171.7 KB · Views: 305
Great build! I’m looking to do something similar. What was the final thickness of the rail after foam? What is the ‘stretch trick’ on the vinyl?
 
Foam was 1" high density foam. 3/4"ply rail was 5" wide.
Use search function for better vinyl stretch description but in short: if your rail is wider than your vinyl, make a relief cut(s) in the middle to make it easier to pull material to where you need it. See pic #1 on post #4. I used the same premise for the foam.
 
5" plywood rail, foam on both sides. Definitely looks wider than i thought it would.
1" HD extra firm foam 60x80, $88
1/4" foam 54x54, $36
heidi black vinyl 60x72. $80
Green speed cloth 60x60, $40
10x slide under cup holders, $55
staples, $7
random hardware for swapping tops (tnut inserts, bolts) $5
air stapler $47
plywood was free because I had some decent stuff laying around.
pedestal base is from a used 48" table i picked up online, $40

putting some tnut inserts in both tops so i can swap out as needed. Will put french cleats under tops and on shop wall so i can hang both when not in use and free up some floor space.
Where did you get the 1" HD foam, the Heidi black vinyl, and speed cloth?

I'm going to be building a secondary table (Round 54-56).
 

Create an account or login to comment

You must be a member in order to leave a comment

Create account

Create an account and join our community. It's easy!

Log in

Already have an account? Log in here.

Back
Top Bottom