43mm trays that stack on 39mm trays and fit in bird cages (1 Viewer)

Ken

Pair
Joined
Sep 1, 2016
Messages
118
Reaction score
257
Location
Cupertino, CA
Long story short: I made my own 43mm chip tray that hold 80 x 43mm chips (Cleveland Horseshoe $1000 and up, specifically) so that the tray stacks on regular 39mm chip trays.


This will be a multi-part post. It may take a few days to get all of it posted.
 
So, you ask, how can I get one for my 43mm chips?

Options:


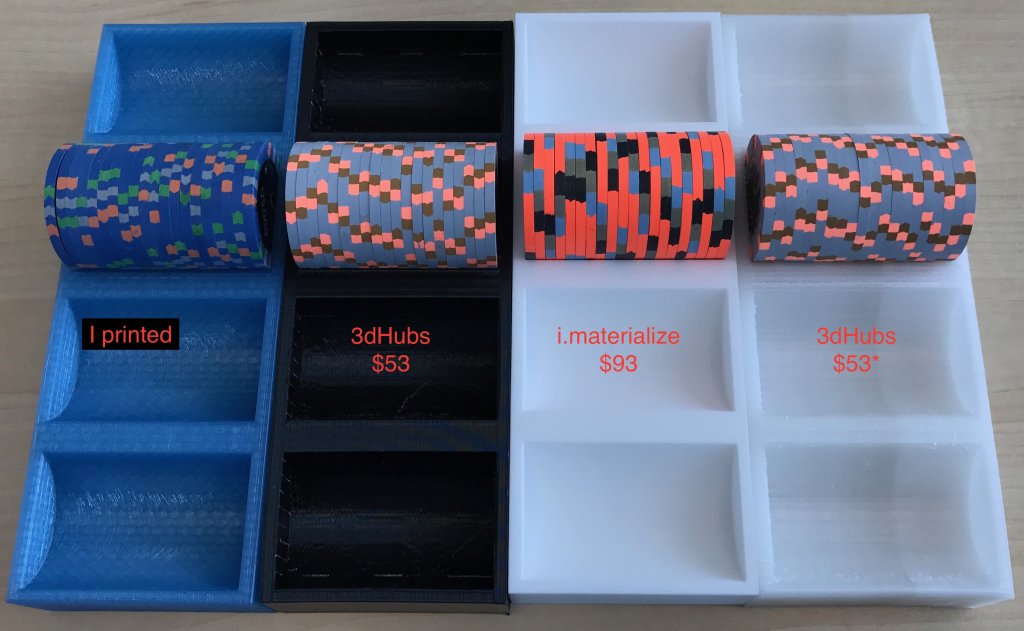
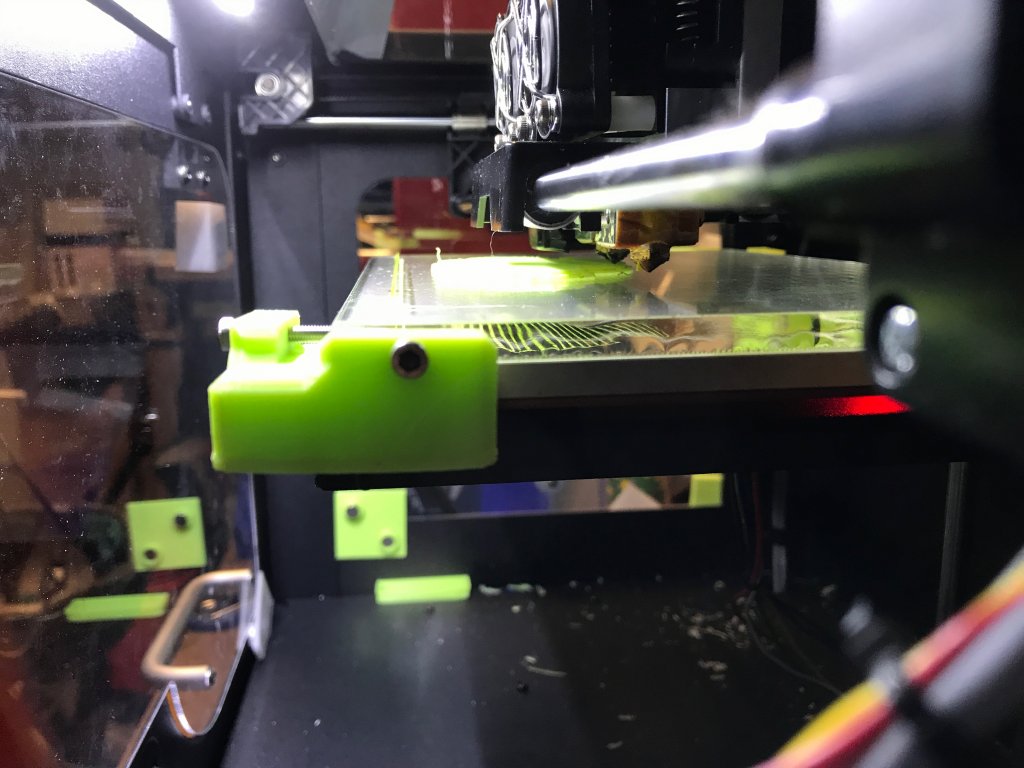
A. download the STL (design) file and print one on your 3D printer (or have a friend do it)

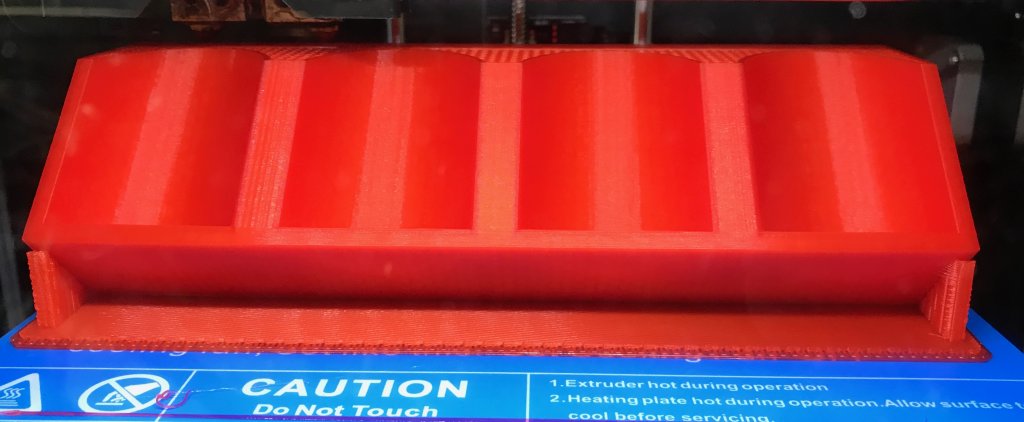
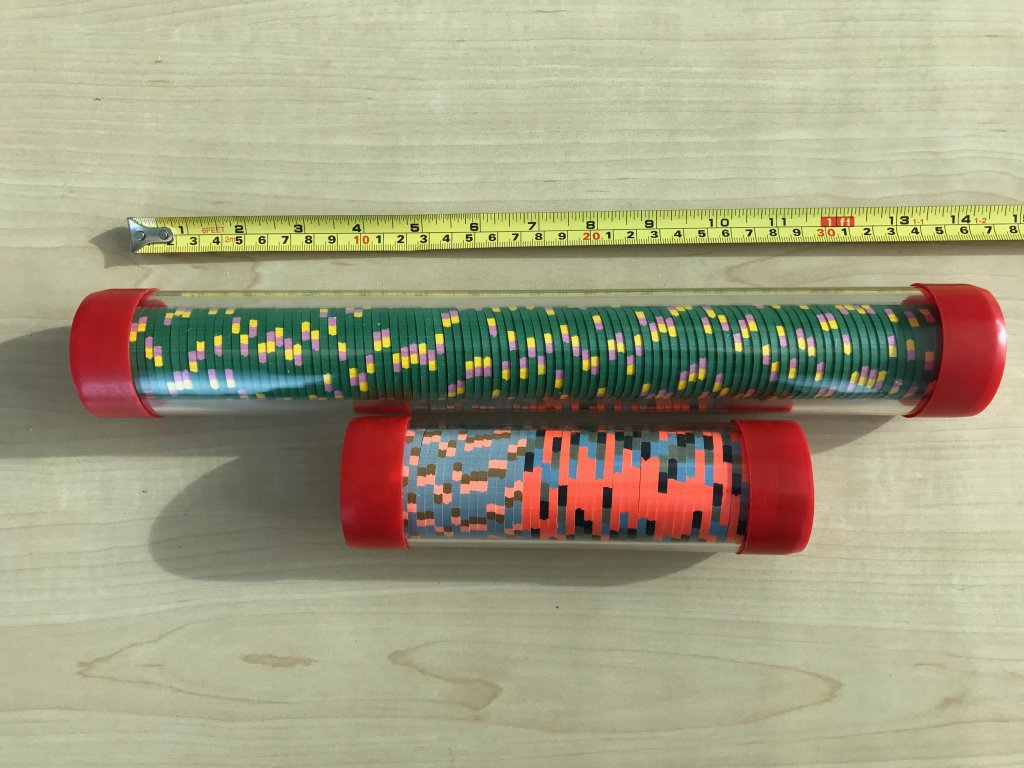
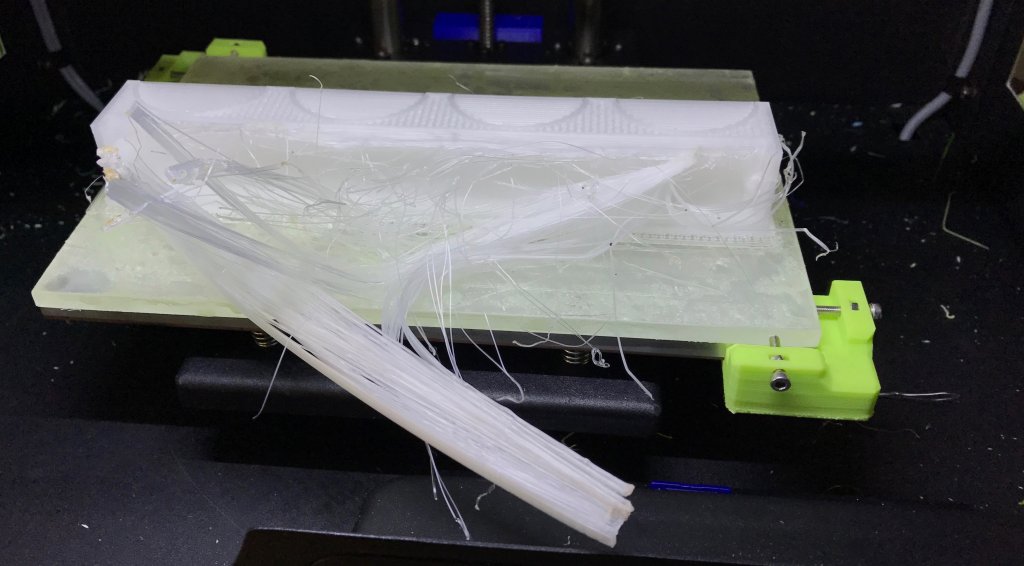
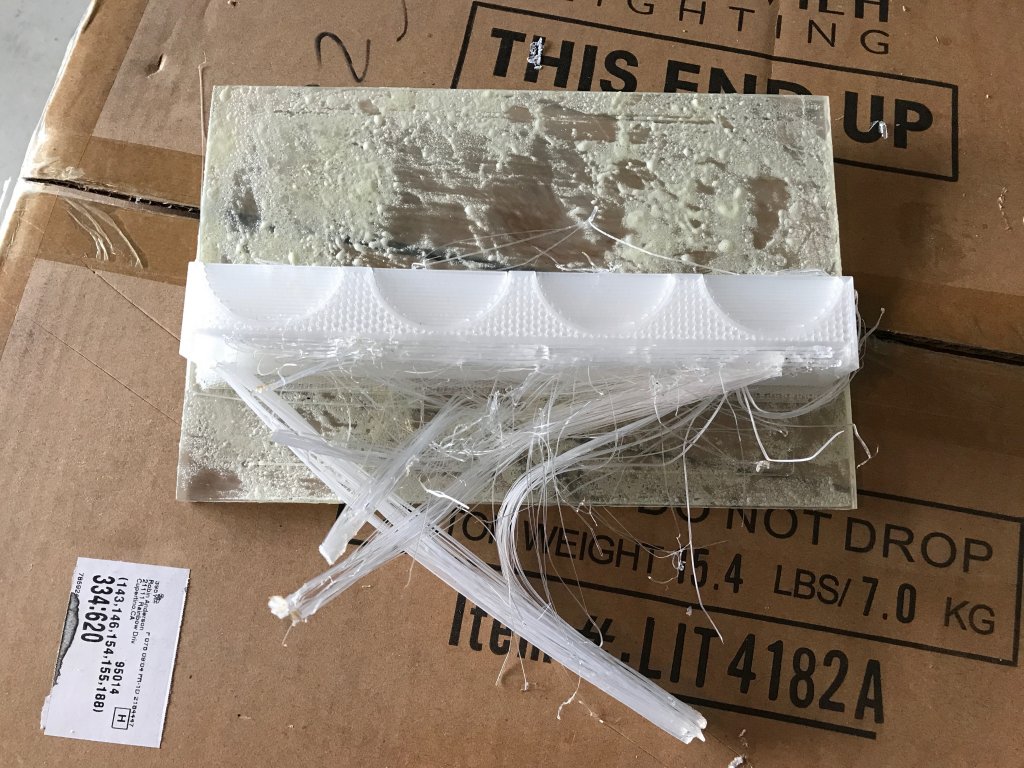
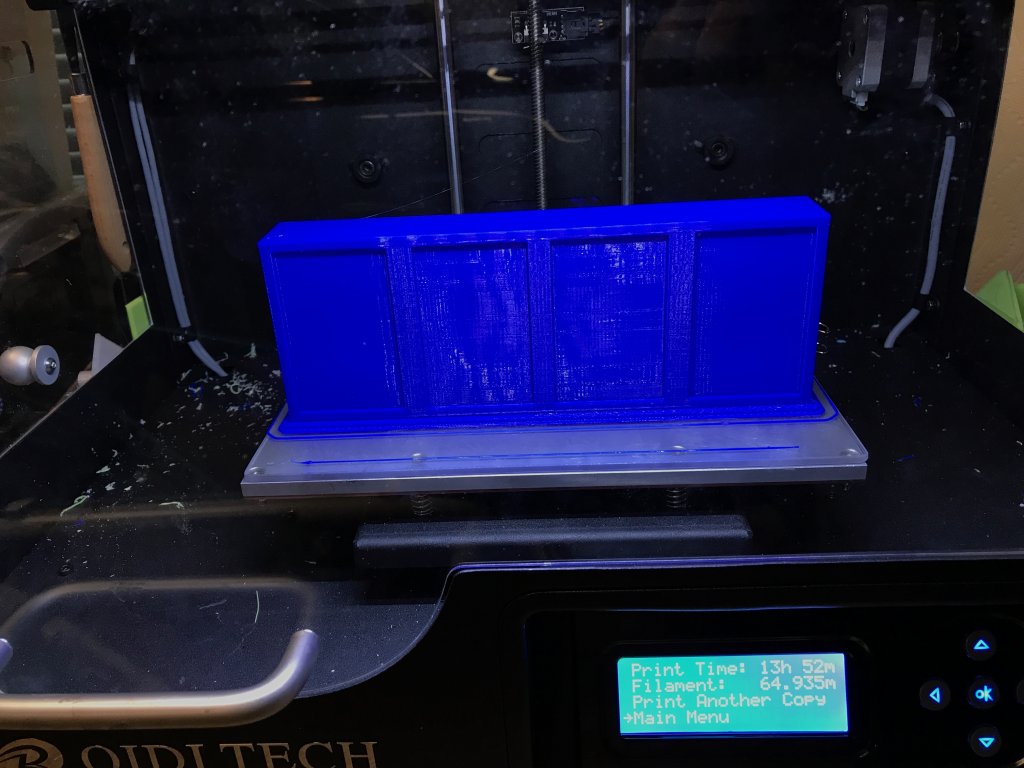
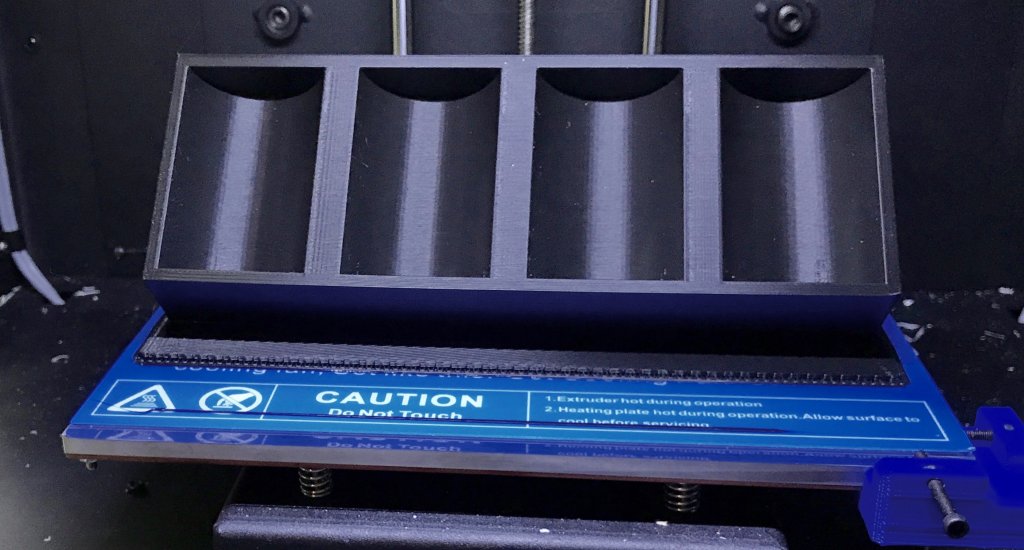
- This is a large part for most entry level 3D printers but they are getting bigger so if you can print a 210 x 76 x 30mm part you are good to try.
- I will send you what I have learned about how to print this part.

B. download the STL file and upload it to a 3D printing service and have them print it for you
- there are at least two levels of service for this:
- cheapest: about $53 and gets a usable print (I have a $10 off coupon to give you that will get the price down to $43 or so)
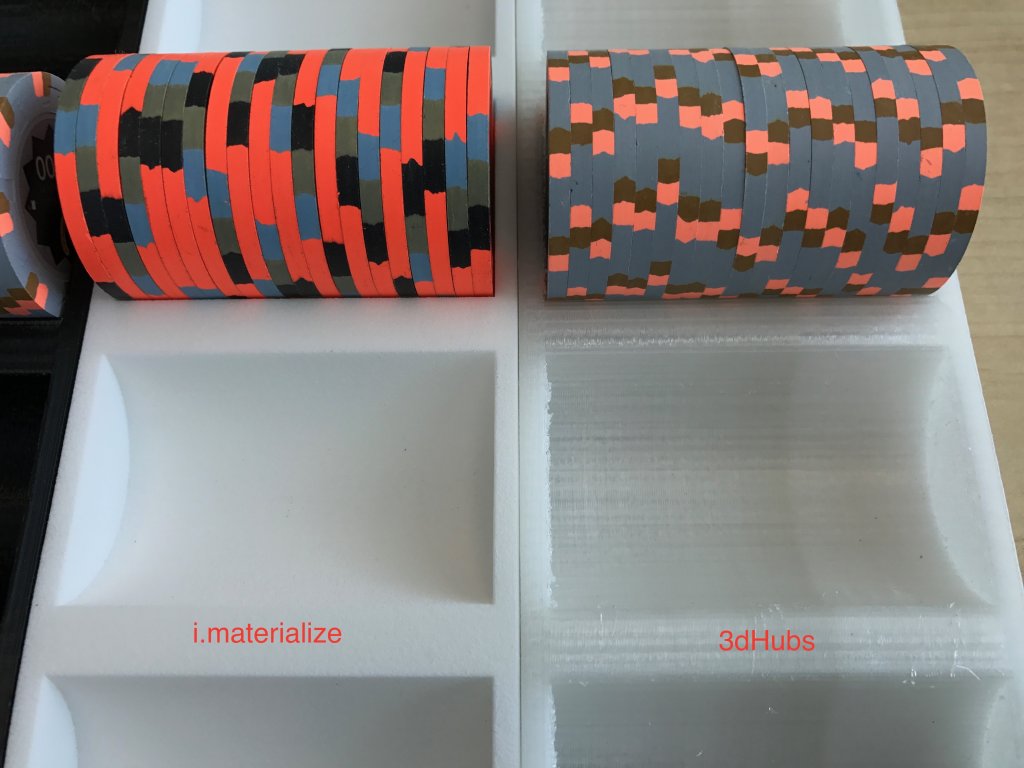
- expensive: about $95 and gets a nice and usable print

- again, I will share my experiences with you so you can get a better print than I did, probably

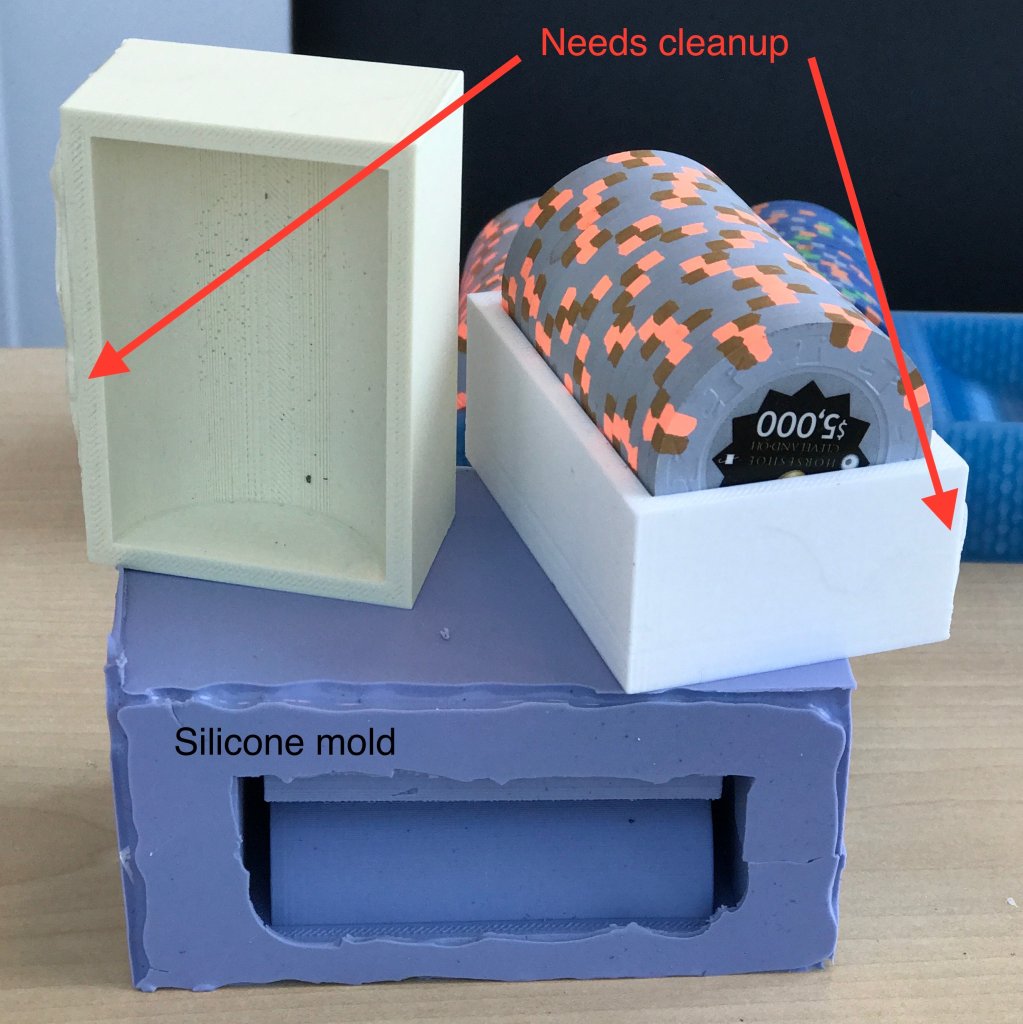
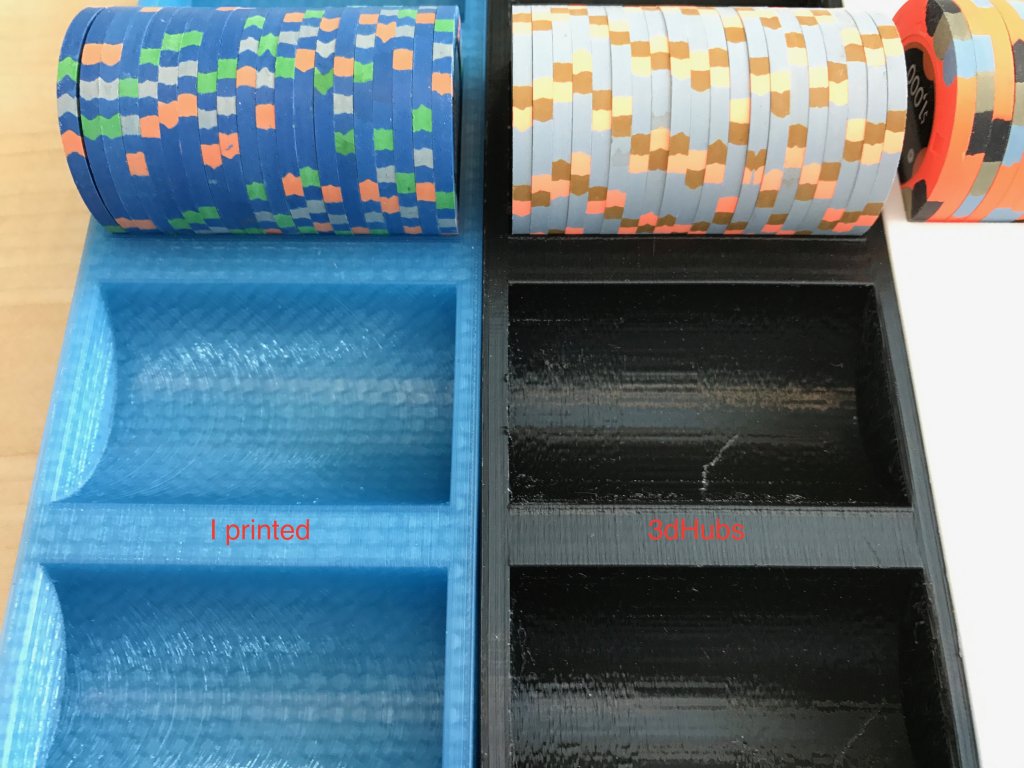
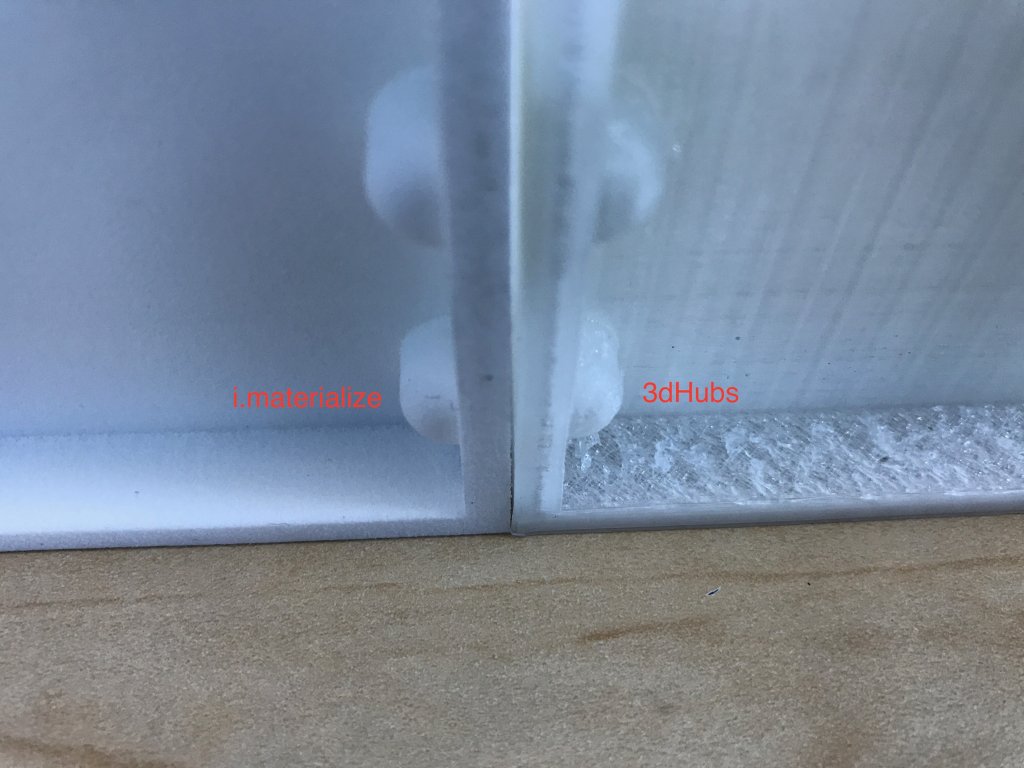
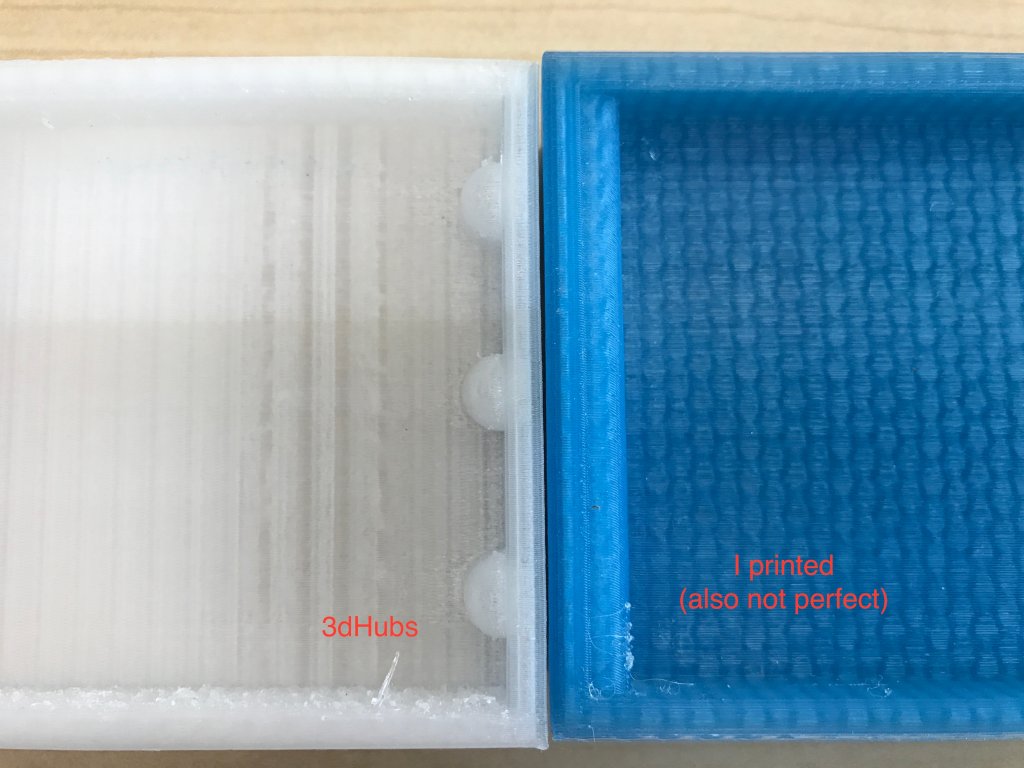
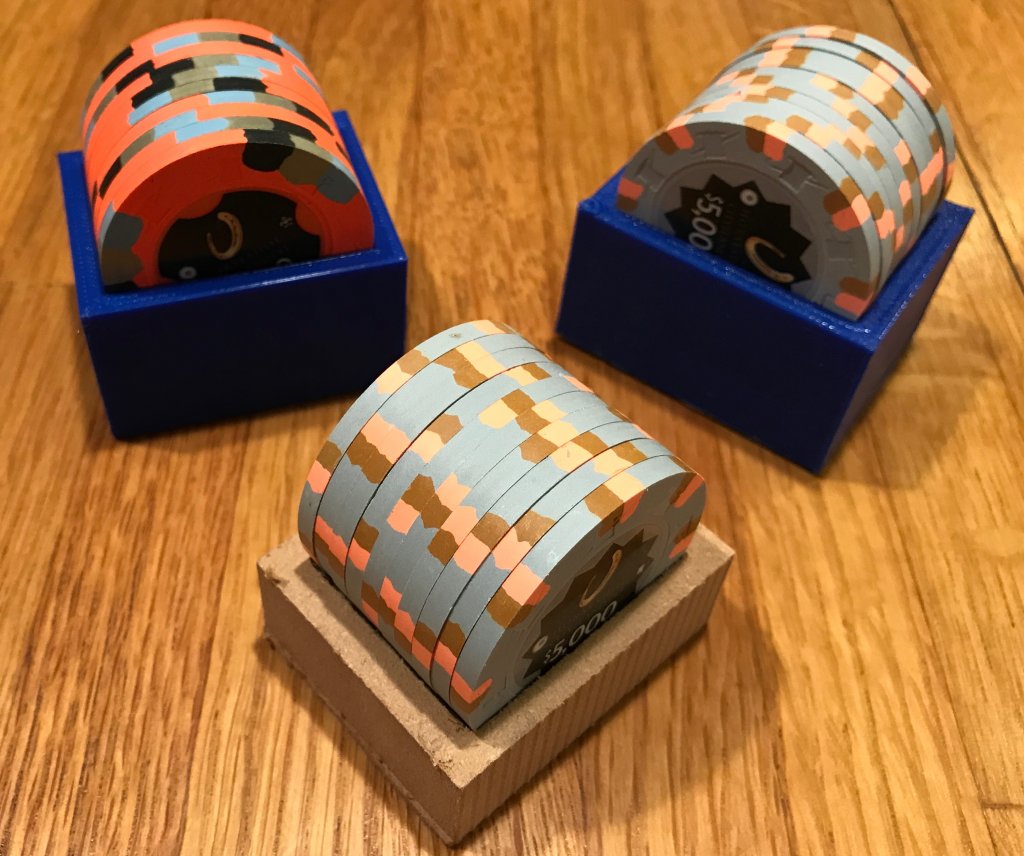
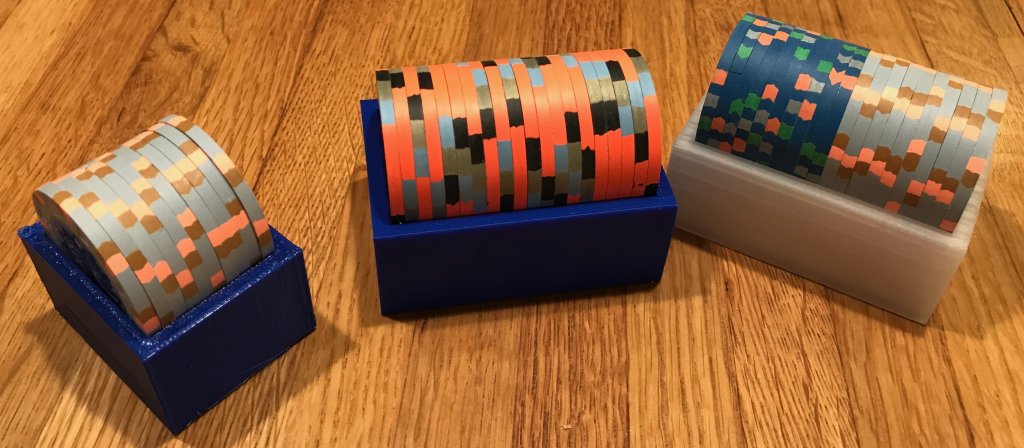
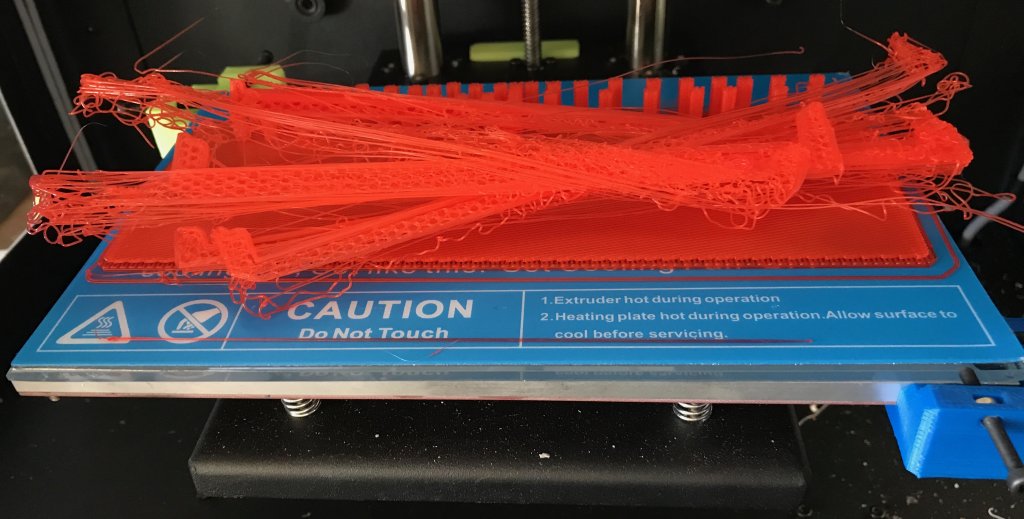
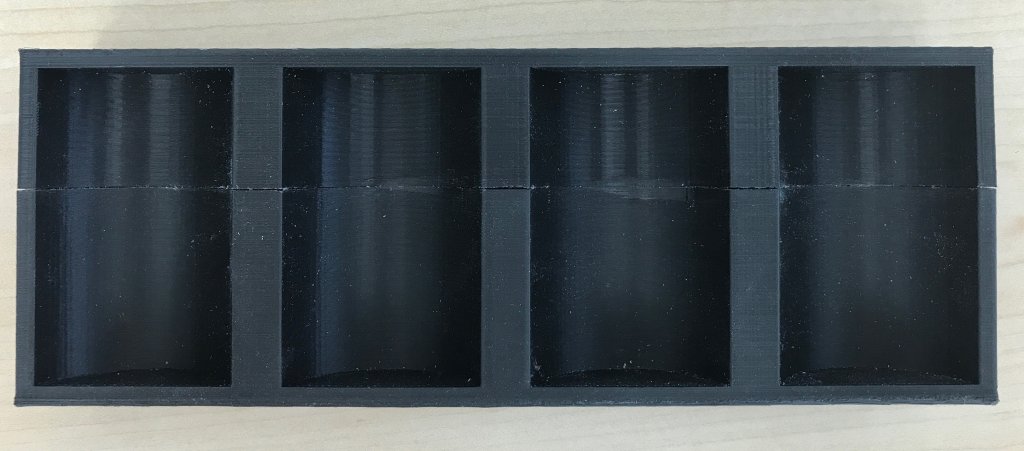
- the photos are showing the worst sections of the prints. They are very useable and unless you are really picky the cheapest one will be fine for most. Of course, you are on this forum so probably more picky than most so I give you the info so you can decide.

C. if the demand is small enough I can print some on my printer for a hopefully break-even fee of about $30 (probably less) (EDIT: 5/6/2017 - now $16) including USA shipping. I have a non-zero failure rate due to the size and it takes a while to print one correctly. I have successfully printed exactly one I really like so I won’t have good costs estimates until I find out what my true failure rate will be.

There is no charge for personal use. If you want to make these commercially let me know and we will work something out.

DM me if you want one for yourself. No obligation, of course.

- Edit - removed form as initial request is over, DM me if you want one.

* - 3dHubs is like the Uber of 3d printers. If you have a 3d printer you can setup a “hub” there and take orders for printing. I am sure the qualify varies by the vendor. I picked two different vendors. One completely failed but refunded my money. The other printed it in black but I had asked for clear so they printed a second one in clear (appears translucent white) for no charge.

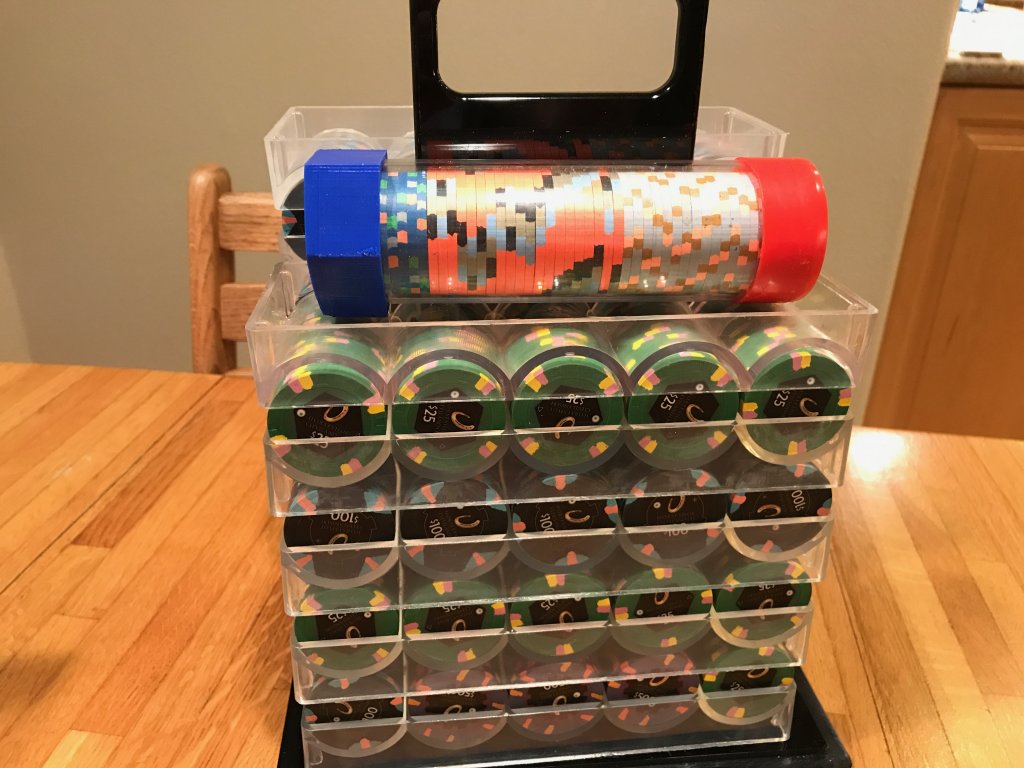
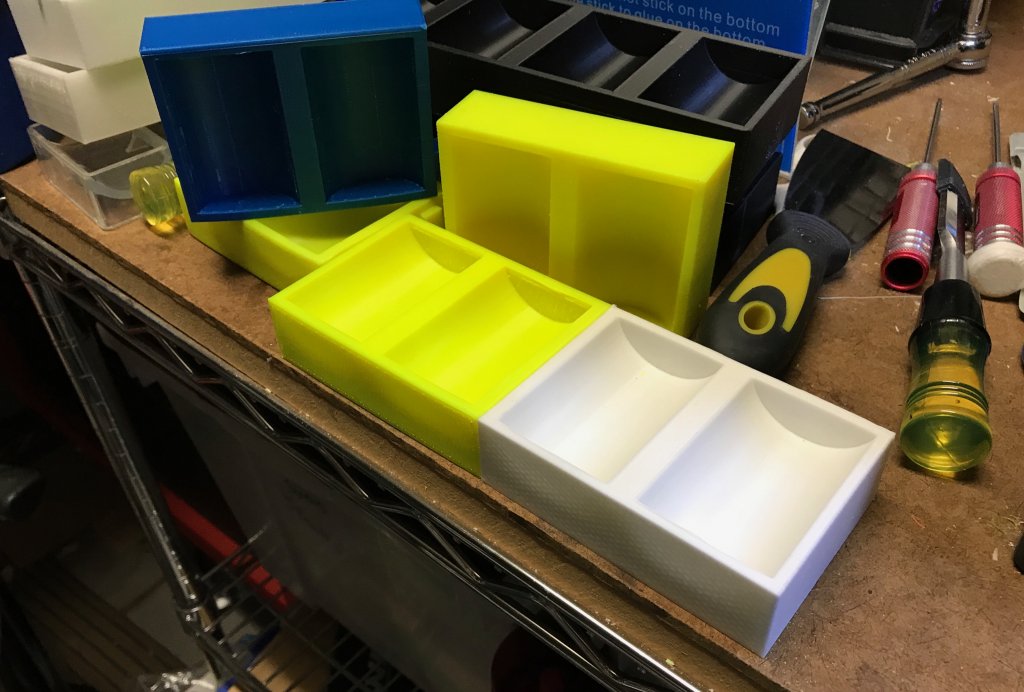
** - I changed the bottom design a bit from the vendor printed ones to my “final” printed one. The three “nubs” were replaced by a same sized rounded “shelf” of sorts. This keeps the tray from sliding back and forth too much on the tray below it. The nubs were fine but the shelf prints easier, generally.
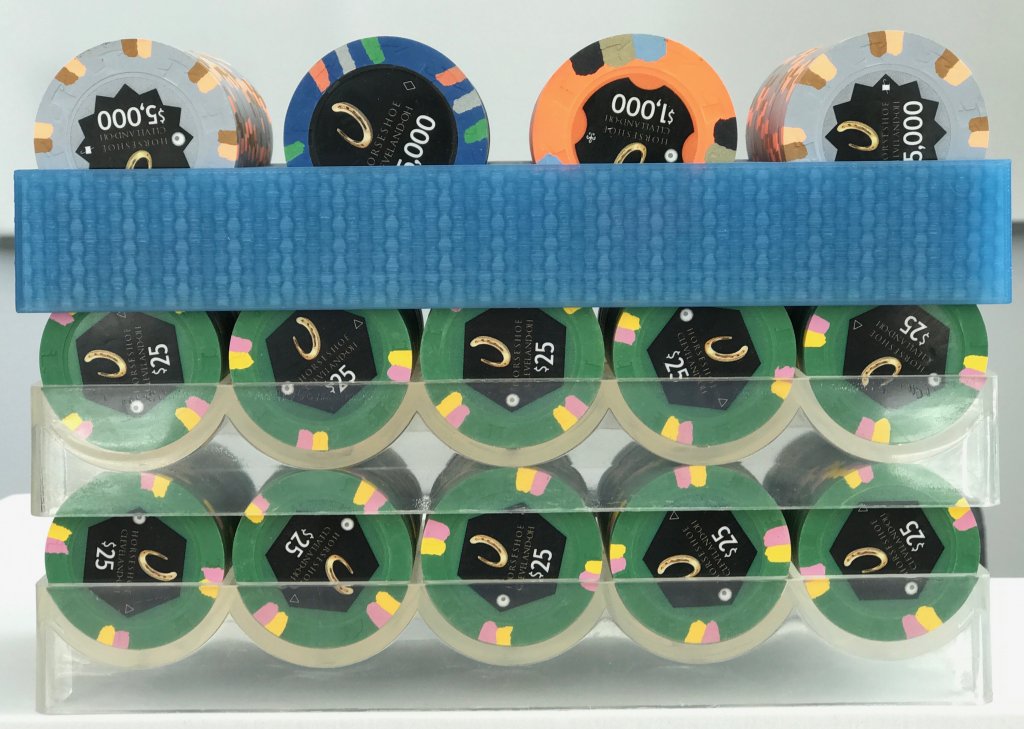
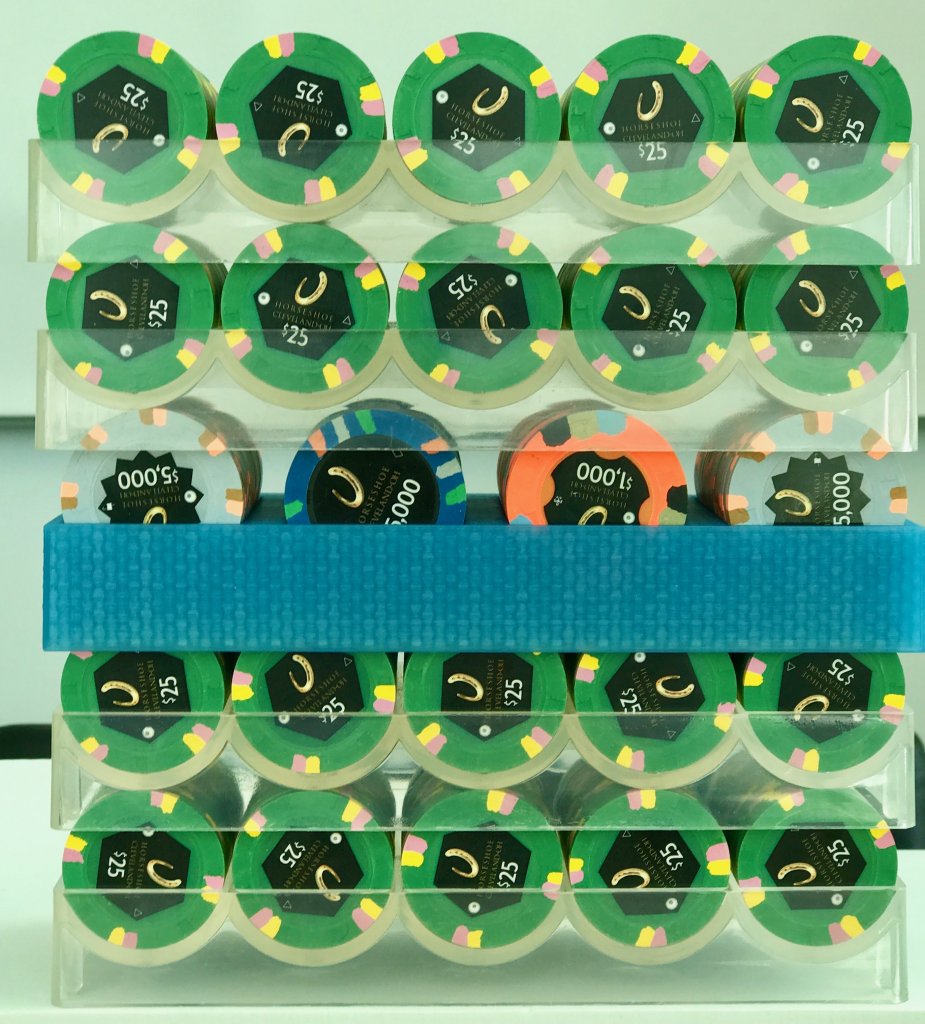
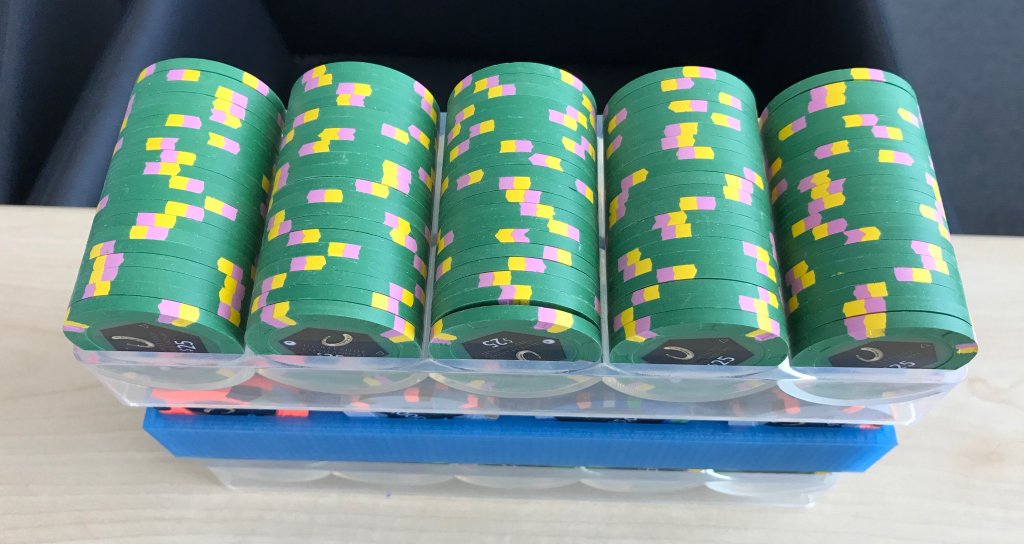
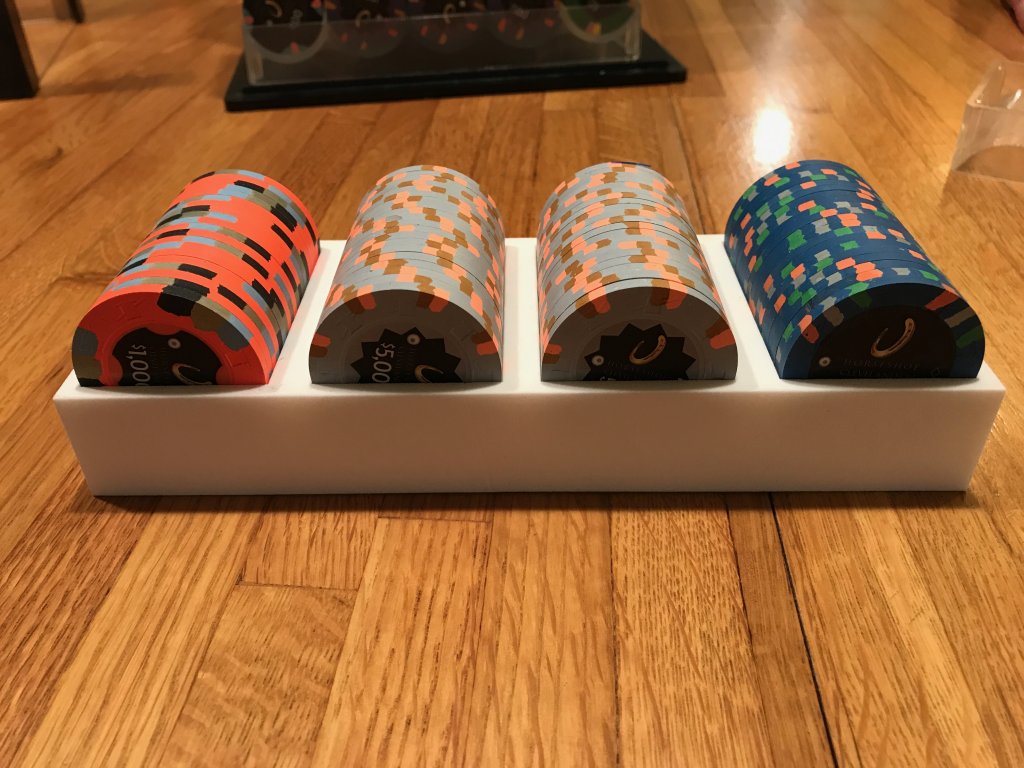
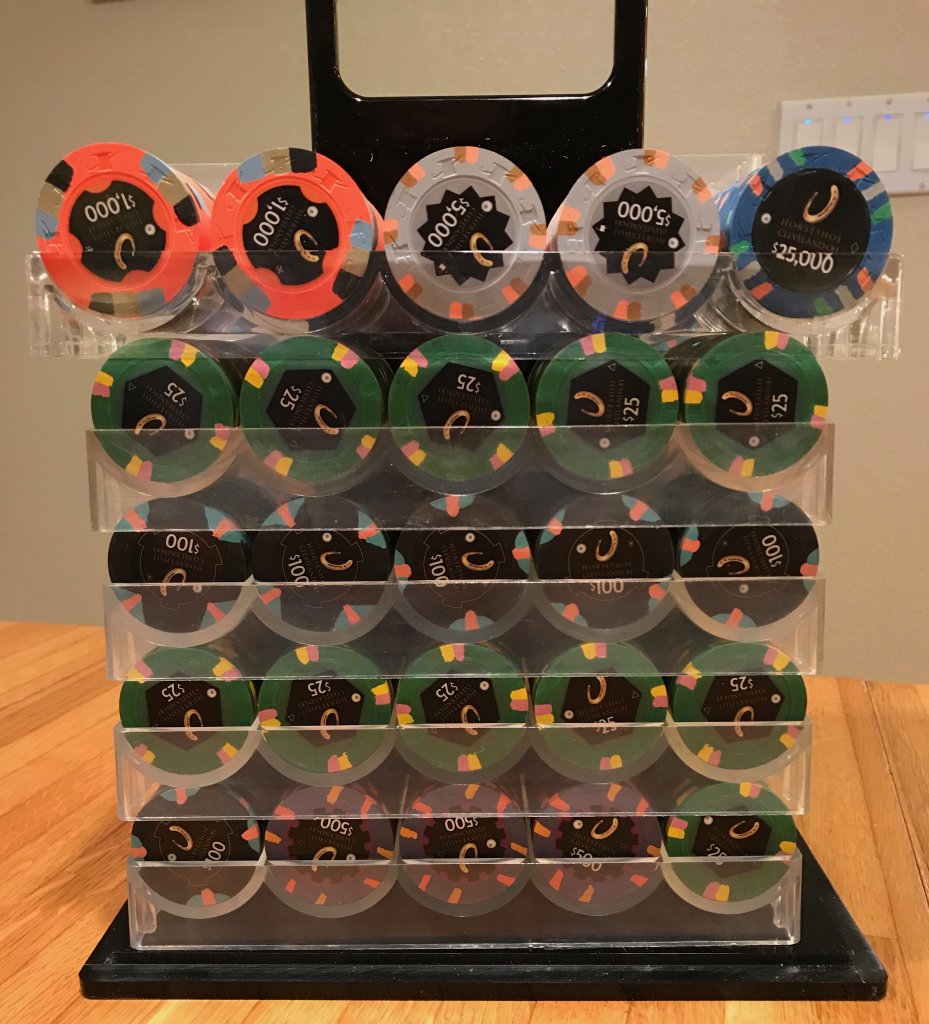
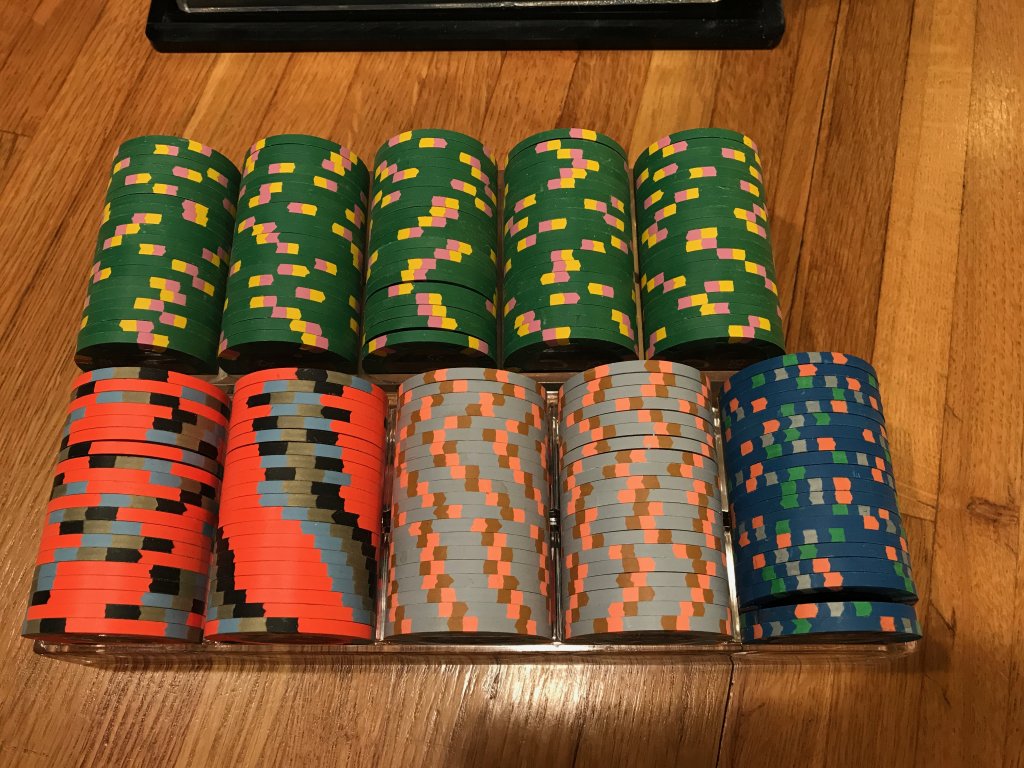
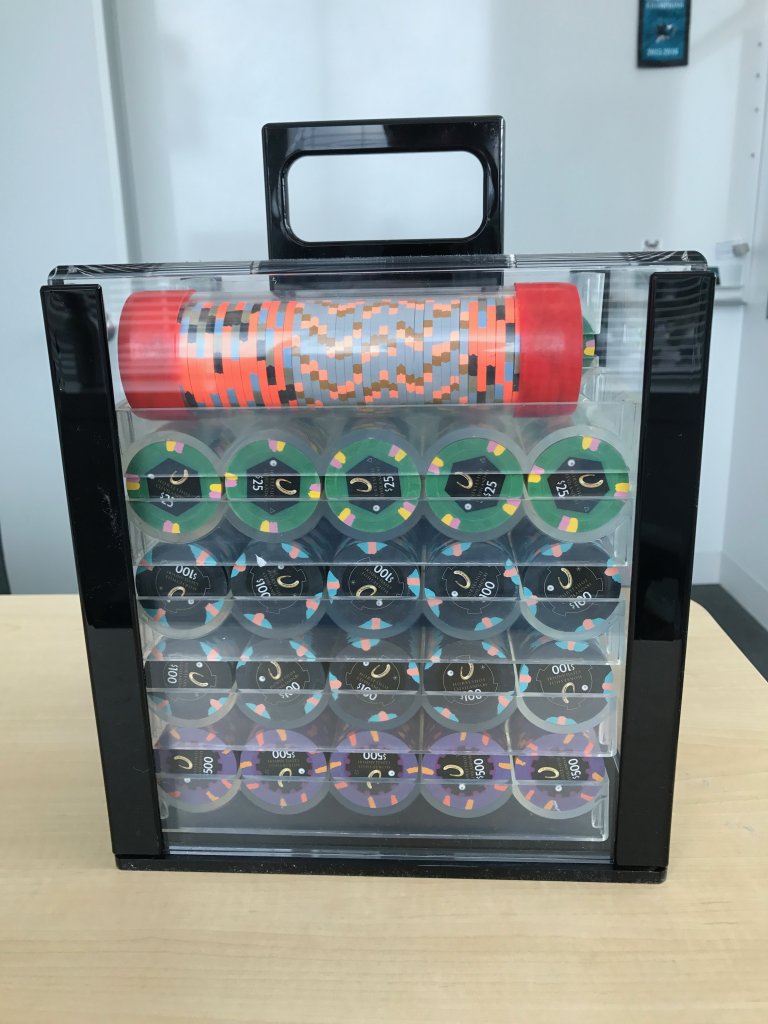
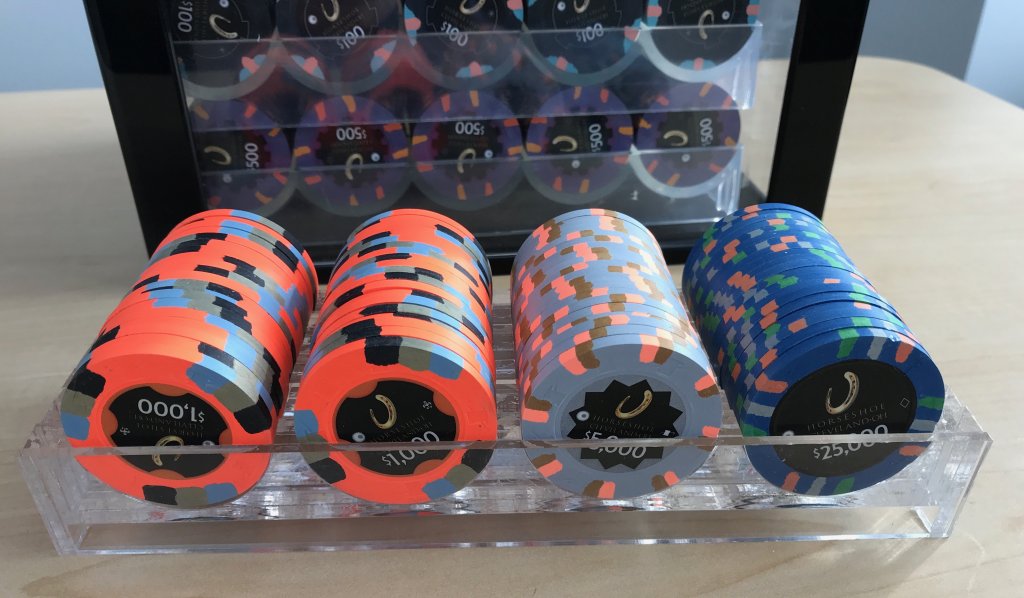
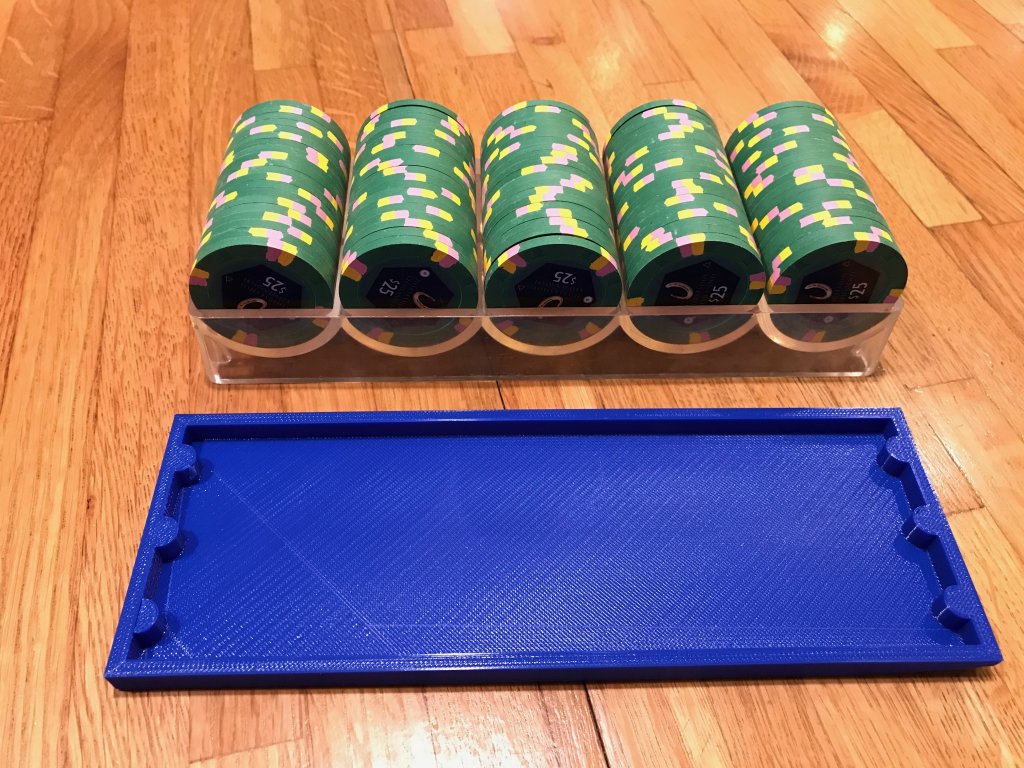
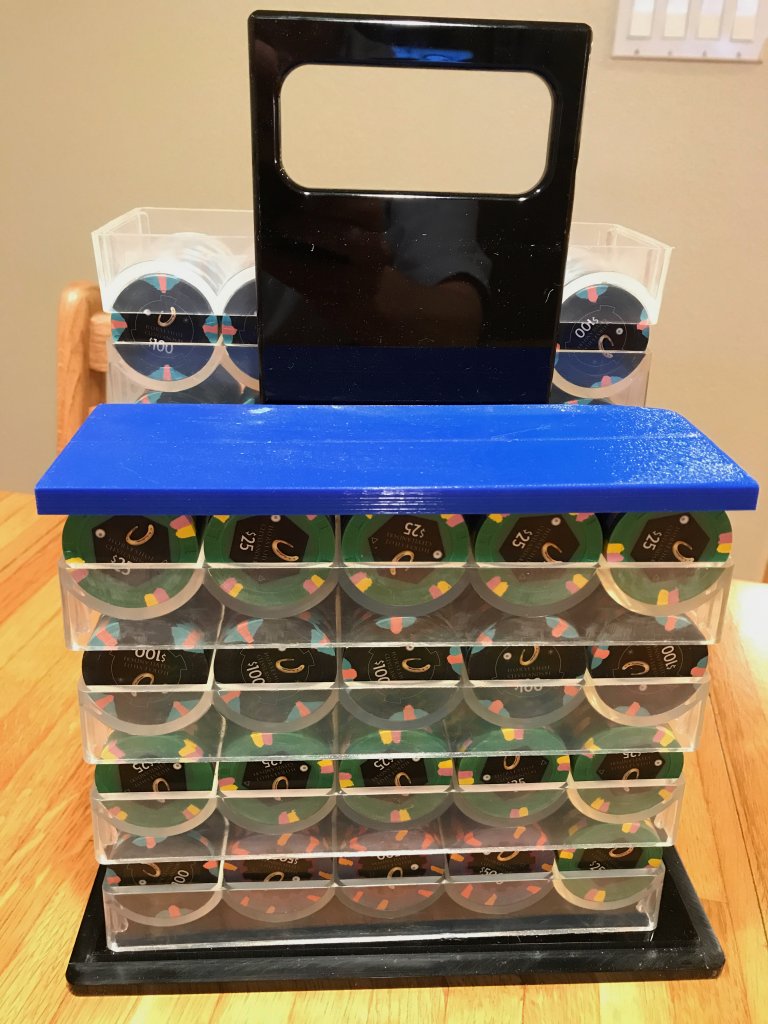
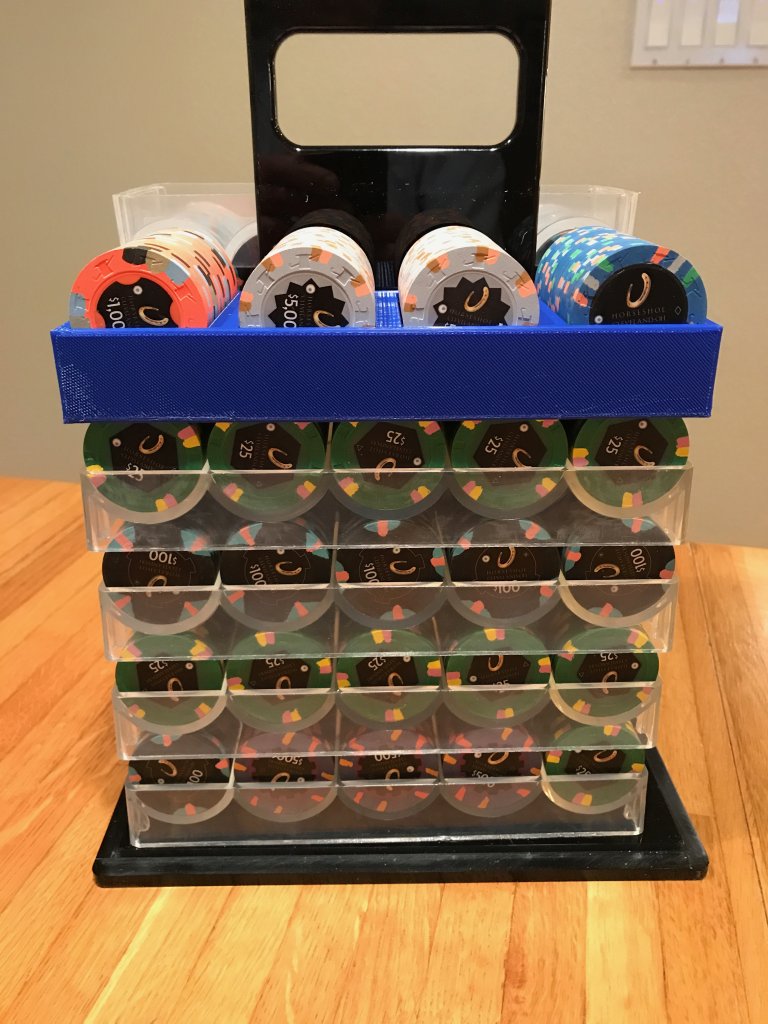
 
Last edited:
The story:

I really liked the Cleveland Horseshoe Chips, especially the secondary set, all crispy and clean. The sound of real Paulsons being stacked is amazing. There is no better chip for “feel”, in my opinion.

I originally bought a few to check them out. Then came the second, third, etc. buys and I kept picking up chips. I swapped with a few collectors to round out my set.

I wanted to get a rack for those sweet Paulsons. The chips $1000 and up are 43mm while the lower denominations are 39mm. So, how to I store and carry these as a set, all together?

The commercially available 43mm chip trays are nice, but, they don’t fit in most standard chip carriers. More important, they don’t stack with 39mm trays.


Maybe I can make something that will work. If not, then I can learn or at least be exposed to some new skills and learn

Someone on the forum was looking into using tubes for carrying chips. I looked into that and came up with a prototype.

 
I really wanted a 43mm tray like the 39mm trays I have that would stack with the 39mm chips so I could put them all into one carrier and go.

So I tried designing one and coming up with manufacturing methods. I decided that an 80 chip rack would fit the size constraints and was a good compromise for my set. First I prototyped it by laser cutting layers of acrylic and gluing them together.


It worked but wasn’t the fit and finish I wanted. I could have done something similar in wood or a block of acrylic / delrin / etc but I had acrylic sheet chunks laying around so tried that first. My biggest complaint was my lack of ability to put pieces together so that they appeared to be one unit. That would be a problem no matter the material I picked.

Then I decided to try and mill the part. I got access to a CNC router (TechShop.ws) and started testing routing out the pockets to hold the chips with mixed results. I had to learn how to design the part in a CAD system in order to get the router to work. I tried a few samples. They were not that good.

The chip trays I have for 39mm chips are injection molded. Maybe go that route. To do that you either hire a firm to do it ($5k and up setup costs) or learn how to do it yourself. I had access to an injection molding machine (Techshop.ws again) but you I would need to make the mold by milling aluminum in the negative of the part I want. So, I took the Tormach milling machine class and signed up for the injection molding class.

Before milling the aluminum injection mold I wanted to make sure the part was sized exactly right. It takes many, many hours to learn the machine and mill this part so I was hoping to only have to do it once, maybe twice. I then learned about 3D printing in order to do more rapid prototyping.

I was hooked. I bought a 3D printer rather than use one of the available printers at TechShop so I could cycle faster.

Now I was designing all kinds of stuff that could be 3D printed. I got a lot better at the CAD system. I learned the 3D printer limitations. I printed a lot of prototype tests.


I also had a lot of failures trying to print full sized trays.

 
After some success and some failures I got one printed good enough that I could manually clean up the tray and have a usable part.


Overall the quality of the 3D printed tray is good enough to use. I don’t need an injection molded version. This will work.

Now that I have a full size tray I tried it out and decided on a couple of improvements. Edit the CAD design and try again. Lots more testing. I am trying to get the process so I can print one. I tried splitting it horizontally and vertically to get around some of the problems printing larger prints.


In the mean time I was thinking about the good players / collectors on the forum who also want one. I certainly don’t have the capacity to make these in quantity. Do I? It takes a long time for each copy and I haven’t had success every time. I guess this is harder than I hoped.

There are 3D printing vendors out there where you send a design and they print it for a fee and ship it to you. I tried two of these using different materials as a test. See my earlier post in this topic about vendors with images.

Then I had an idea of printing the entire tray at one time but tilted at a 45 degree angle. The printers can print up to 45 degrees with no support structure which means a cleaner finished part.


A couple of tweaks later and I got it. The photos in the first post showing the translucent blue tray are of the first one I got right. I like how the translucent plastic shows some of the internal structure.

I am trying to reproduce my results and will post updates as I do.
 
... and that is where I am right now. I guess I got it all posted over lunch rather than the days I had anticipated.
 
It's not the finished product; it's the journey to get there.

Definitely watching with interest. As the proud owner of 300 44mm CPCs I can attest to the fact that while the commercial 43mm racks work well you can only get 19 chips per barrel. First world problems.
 
  • Like
Reactions: Ken
It's not the finished product; it's the journey to get there.

Definitely watching with interest. As the proud owner of 300 44mm CPCs I can attest to the fact that while the commercial 43mm racks work well you can only get 19 chips per barrel. First world problems.


If you can measure the height of a stack of 20 (as accurately as you can) I can probably make a test column and send you for verification. This rack was designed parametrically in CAD software with the thought of maybe also making custom 39mm trays or even trays with 2x20x43mm and 2x20x39mm if desired.
 
If you can measure the height of a stack of 20 (as accurately as you can) I can probably make a test column and send you for verification. This rack was designed parametrically in CAD software with the thought of maybe also making custom 39mm trays or even trays with 2x20x43mm and 2x20x39mm if desired.
68.5 mm seems to be it. If you happen to have a Key West rack those are exactly the right height. A barrel of 44s fits in a 39mm Key West rack perfectly, heightwise.

Before I ordered I asked David about racks and he said he's never found one for their chips that is exactly right. You could be on to something here.
 
If you can measure the height of a stack of 20 (as accurately as you can) I can probably make a test column and send you for verification. This rack was designed parametrically in CAD software with the thought of maybe also making custom 39mm trays or even trays with 2x20x43mm and 2x20x39mm if desired.
2.75" near as I can tell. But I will get you more precise if needed. I will even send you 44mm CPC chips if that will help:D

20170503_202700.jpg
 
Nicely done. 3D printing is the future. Eventually factories will be decentralized and even more nonspecific to a company. You will order any product via an Amazon type company and it will get printed by order at a local 3D print facility and then delivered. Less shipping, less materials and way fewer jobs.
 
Last edited:
2.75" near as I can tell. But I will get you more precise if needed. I will even send you 44mm CPC chips if that will help:D

View attachment 97001
It appears that you and DJ Mack are both about the same at 68.5mm which is a shade under 2 3/4" (2.69685" ~= 68.5mm). I'll see if I can print a holder for one barrel for testing purposes.
 
Amazing job and thanks for detailing it. Very interested in following this. Your needs that drove you to do this project are the same that I have been struggling with. Well done
 
Excellent job on the rack, detailed post, and photos! It was interesting to read about the 3D printing process, and seeing the prototypes and failures along the way. Thanks for sharing.
 
no.

unless it is $1000, then I will just hold them in my hand.


Let me rephrase my statement to clarify,

Without owning a 3D-printer, and not wanting to pay some 3rd-party to print it for $50, AND it becomes mass produced by the OP or others to reduce unit cost, THEN, when will they be available for purchase?


Also, I cannot read, stop asking me to.
 
Last edited:
no.

unless it is $1000, then I will just hold them in my hand.


Let me rephrase my statement to clarify,

Without owning a 3D-printer, and not wanting to pay some 3rd-party to print it for $50, AND it becomes mass produced by the OP or others to reduce unit cost, THEN, when will they be available for purchase?


Also, I cannot read, stop asking me to.
FWIW I don't think those are actually the prices, I believe it's the cost.
 
no.

unless it is $1000, then I will just hold them in my hand.


Let me rephrase my statement to clarify,

Without owning a 3D-printer, and not wanting to pay some 3rd-party to print it for $50, AND it becomes mass produced by the OP or others to reduce unit cost, THEN, when will they be available for purchase?


Also, I cannot read, stop asking me to.

I never had any intention of producing these for sale, at least in any commercial way.

I just wasn't satisfied with available choices for transporting these 43mm chips so set out to solve MY problem. The solution I wanted didn't exist in the world, or at least I couldn't find it. So, now it does.

At this point it is still kinda expensive.

If you want one of these it is now possible, but not exactly practical, to have one.

What price would make you buy? How many?
 
Injection molding:

I priced out injection molding. It is a little over $5k to setup (some quoted $20k). Then it would cost around $8 each to make. I don't know the market for this type of tray but if I could sell 1000 then break even would be about $13 each ($8 + $5k/1000). That isn't so bad. However, I don't want to gear up to sell 1000 of these, if worldwide demand is even that high. I could get the per unit cost down to $6 at quantity 5000. But then I would end up with 4900 in my garage.

There is also a technical problem that makes injection molding tricky. Most trays have a rounded bottom that mirrors the top. This tray has a flat bottom so that it will sit on a rack with four OR five rows of chips. That flatness causes a thick area in the mold that is likely to contract when cooling and ejected from the mold causing a concavity on the bottom right where the middle row of a normal 39mm x 100 tray would sit. It would still work but might wobble. Also, that contraction would cause a much higher failure rate than normal due to twisting and distorting the rest of the tray. Of course, this could be BS told to me by an injection molding company I contacted. A second company also mention part thickness as a concern without all the details. So, I didn't want to take a $5k risk to make a version of something I already had in my hand.
 
Silicon molding:

I also investigated making one good print (or having it made) then creating a silicone mold and using resins to make copies. This works and is faster than 3d printing but has some drawbacks.

Cost to setup and make that first mold would be at least $100 in materials if I got it right on the first try. Then the cost of the resin to make each part is about the same as the plastic filament to 3d print it. After molding you need to do some labor to cleanup the part as there are mold marks, etc. on it.

Of course, I tried it anyway on a small, one barrel mold. Here is a photo that shows the mold and two molded parts each from a different resin material.


The upside of this is that after you make the mold you spend about 10 minutes preparing, 15 minutes waiting, then another 10 minutes cleaning up the part so you get almost two parts per hour. You have to be present for that whole time. And there is some skill necessary in the cleanup that I don't exactly have but could obtain with practice.

3d printing after you have figured out the formula is a few minutes preparing then wait 14 hours. You should check it often at the beginning as you may want to abort the print and start over if it is failing but otherwise you can leave and come back later to pick up the print. A couple of minutes of easy cleanup on the 3d printed part and you are done.
 
A second good print is almost done. I had one failure between this one and the last good print but this bodes well for cost as this is the cheaper filament AND my failure rate is reducing.

 
I was wondering when these would be appearing. I always thought that 3D printing them would be a great solution, just not super cost effective. An elegant solution indeed.
 

Create an account or login to comment

You must be a member in order to leave a comment

Create account

Create an account and join our community. It's easy!

Log in

Already have an account? Log in here.

Back
Top Bottom